
Precision Farming Class 9 is Chapter 3 of the NCERT Kaushal Vikas (Skill Education) textbook for Grade 9, printed on pages 39–60. It is one complete project: planning and building a small precision farming unit using weather data, soil tests, sensors and simple crop-protection structures. The official chapter PDF is linked below.
Download the Precision Farming Class 9 NCERT chapter PDF
If you want the exact file for your own copy, open the NCERT Class 9 Kaushal Vikas Chapter 3 Precision Farming PDF on the official NCERT portal — it is the Grade 9 Skill Education chapter on pages 39–60 of the printed book, free to read and download.
Chapter 3 at a glance: what the PDF contains
This file is the official NCERT chapter for Grade 9 Skill Education: Chapter 3, Precision Farming. It opens with a remote-sensing health map of a crop field, then runs as one project — scoping, weather data, layout, materials and tools, cost estimation, building structures, soil testing, biofertiliser, pest management and harvesting.
The chapter is project-based, not theory-heavy. Portfolio, Task and Check Your Understanding labels mark the evidence you should keep as you go. This is the NCERT-published Kaushal Vikas book, official edition from ncert.nic.in.
How the chapter is organised: a project from planning to harvest
The chapter moves in the order a real project would follow — decide, plan, build, maintain, harvest. The table below maps every section to its NCERT page, so you can jump straight to the part that confuses you.
| Section | What it covers | NCERT page |
|---|---|---|
| 3.1 Introduction | Defines precision farming; Table 3.1 contrasts traditional and precision farming | p. 40 |
| 3.2 Scoping work and process chart | Deciding where, which plants and which technology; process-chart template (Table 3.2) | p. 41–42 |
| 3.3 Site visit | Guidelines for observing a real farm or greenhouse (Table 3.3); low-tunnel caselet | p. 43 |
| 3.4 Weather data and layout | Table 3.4 matches protection mode to weather problem; Check Your Understanding caselet; layout plan (Figure 3.3) | p. 44–45 |
| 3.5–3.6 Materials and tools | What to collect or buy, with safety notes (Tables 3.5 and 3.6) | p. 46–47 |
| 3.7 Bill of Materials | Costing template and a worked school example (Table 3.7) | p. 48 |
| 3.8 Building the unit | Humidity chamber, low-tunnel, drip irrigation, soil organic carbon test, compost calculation | p. 49–54 |
| 3.9 Biofertiliser | Preparing a LAB culture from rice rinse water and milk; Trichoderma caselet | p. 55–56 |
| 3.10 Pest identification and management | Light trap, LDR sensor, NPSS app | p. 57 |
| 3.11 Harvesting, packaging and storage | Data-driven harvest timing, climate-controlled storage, QR labels | p. 58 |
| 3.12–3.13 Closing checklist and self-assessment | Six-point checklist and reflection questions | p. 59–60 |
A worked Bill of Materials example
The chapter’s labour-cost rule is \( \text{cost} = \text{hours} \times \text{hourly rate} \times \text{frequency} \) (Table 3.7, NCERT p. 48). Here is a fresh example for a 20 square metre plot, with new quantities and rates.
| Task | Calculation | Estimated cost |
|---|---|---|
| Watering beds | \(0.5 \times 10 \times 14\) | ₹70 |
| Marking land and cleaning | \(0.5 \times 20 \times 1\) | ₹10 |
| Making raised beds | \(1.5 \times 25 \times 2\) | ₹75 |
| Building the low-tunnel | \(2.0 \times 30 \times 1\) | ₹60 |
| Total labour | ₹215 |
The pattern is the point: every task is costed on paper before the work starts, so the group buys only what it needs and nothing extra (NCERT p. 48).
Key concepts: what precision farming actually changes
Precision farming gives each plant exactly what it needs — the right water, nutrients and care at the right time and in the right amount — using data and simple structures. Everything else in the chapter is a measurement, a structure or an input that serves that one idea.
What “precision” means
The chapter defines precision farming as the use of science and technology to improve agricultural yield while caring for the environment (NCERT p. 40). Precision means “exactly as required and consistent — the same every time.” So a precision unit does not treat a whole field alike; it decides what each small area needs, then acts only on that.
This matters most in small nurseries, where space and resources are limited. Drip irrigation, sensors and data-based decisions save water, reduce excess fertiliser and pesticide, and grow healthier plants (NCERT p. 40).
Traditional versus precision farming
Table 3.1 lines up the two ways of farming side by side. The precision column has one pattern: every input becomes a measured decision instead of an estimate.
| Farming practice | Traditional farming | Precision farming |
|---|---|---|
| Agro-climatic impact | No control over climatic parameters | Precise control of temperature, humidity and light through greenhouse, shade-net and weather forecasts |
| Seed sowing | Broadcasting seed or sowing with manual tools | Machinery at proper spacing and depth; modern plant nurseries |
| Irrigation | Flood irrigation of the whole field | Targeted micro-irrigation guided by soil-moisture sensors and automation |
| Fertiliser and pest management | Doses estimated by experience | Need-based application from soil analysis, drone or satellite images, apps and experts |
| Harvesting and packaging | Higher losses from poor handling and packaging | Lower losses; automated harvesters, sensors and digital labels |
Choosing the right crop protection: a decision table
Plants first need protection from the weather your area actually has. The chapter’s rule is to collect temperature, rainfall and humidity data, then choose the structure that solves the biggest problem (Table 3.4, NCERT p. 44).
| Weather problem in your area | Protection method | What Table 3.4 says it does |
|---|---|---|
| Very hot weather needing lower temperature | Greenhouse | Lowers temperature |
| Frost or heavy rainfall | Greenhouse | Protects from rainfall and frost |
| Winter cold that shortens the growing season | Low-tunnel | Increases temperature; traps solar heat (p. 50) |
| Nursery seedlings needing steady moisture | Humidity chamber | Increases humidity, especially for young seedlings |
| High temperatures and scorching heat | Shade-net | Protects from high temperatures and scorching heat |
Working through the chapter’s monsoon caselet
The Check Your Understanding caselet gives real weather data: temperature between \( 22^\circ\text{C} \) and \( 34^\circ\text{C} \), with April and May the hottest months and December the coolest; heavy monsoon rain from June to September, about 3,000 to 3,350 mm a year; and humidity of 70 to 90 per cent during the monsoon (NCERT p. 45).
Run each protection mode against that data. A shade-net treats scorching heat, but this region rarely crosses \( 34^\circ\text{C} \). A low-tunnel raises temperature, which the region needs only in December. Humidity is already high, so an extra humidity chamber would mainly serve the nursery.
The dominant threat is the monsoon rain, and the one mode in Table 3.4 that protects from rainfall is the greenhouse. The worked answer is therefore a greenhouse, justified by the rainfall data. A full answer should name the data point that drove the choice — that is what a data-based decision means here.
The precision nursery: humidity chamber first, low-tunnel second
Seedlings sprout best in steady, high moisture, before their roots have developed (NCERT p. 43). The chapter’s sequence is to germinate seeds or cuttings in a humidity chamber, then move the young plants to a low-tunnel for controlled growth. Both structures keep warmth and soil moisture, which reduces the need for daily watering (NCERT p. 49).
Water, sensors and fertigation
Drip irrigation delivers water drop by drop to the root zone through small drippers, instead of flooding the whole bed (NCERT p. 51). Add a soil-moisture sensor, and the system waters only when the soil is actually dry.
Fertigation is the chapter’s term for dissolving nutrients into the irrigation tank, so water and fertiliser reach the plant together in a measured amount (NCERT p. 52).
Test the soil before you add compost
Soil should hold 1.5 to 2.0 per cent organic carbon for healthy plant growth (NCERT p. 54). The chapter’s rough test uses 3 per cent hydrogen peroxide: pour it over two soil samples — one with compost, one without — and watch the reaction. The peroxide oxidises organic carbon and releases oxygen gas, so bubbling reveals the carbon level (NCERT p. 53).
| Observation with hydrogen peroxide | Conclusion about the soil (Table 3.8, NCERT p. 53) |
|---|---|
| No bubbling | Poor or very low organic carbon |
| Light bubbling | Moderate organic carbon |
| Intense effervescence and/or foam | Good or high organic carbon |
Read this scale correctly and you can judge a bed before spending money on compost. The chapter calls the test a rough estimation — the point is to measure, not to guess.
Biofertilisers: living inputs
Biofertilisers are made from beneficial micro-organisms — bacteria, fungi and algae — that help plants absorb nutrients and improve soil fertility (NCERT p. 55). The chapter’s main example is a LAB culture grown from rice rinse water and milk.
A caselet adds Trichoderma, a fungus that lives on root surfaces, helps the plant absorb phosphorus, and releases enzymes and natural toxins that break down harmful fungi (NCERT p. 56).
Manage pests, never eliminate them
Insects are part of the ecosystem, so the rule is to manage the pest population, not wipe it out (NCERT p. 57). Identification comes first: a light trap attracts night insects, and the NPSS app — an ICAR tool built on artificial intelligence and machine learning — identifies the insects from your phone.
Harvest with data
Harvest when temperature and humidity are at their lowest, using your school observatory or meteorological data (NCERT p. 58). Store produce where sensors act for you: a humidity sensor can trigger a fan, and an LDR can detect a door left open and pull down shades. Package with a QR code that records origin, harvest date and techniques used.
Throughout, the chapter reuses Chapter 1 of this book — the agro-climate relationship, the school meteorological observatory, and soil texture and pH tests (NCERT p. 41, 44, 53).
Figure walkthrough: the diagrams that drive decisions
The figures below are the ones that matter in the printed chapter. Each carries a decision, so read them as tools rather than illustrations.
Figure 3.1: reading the health map
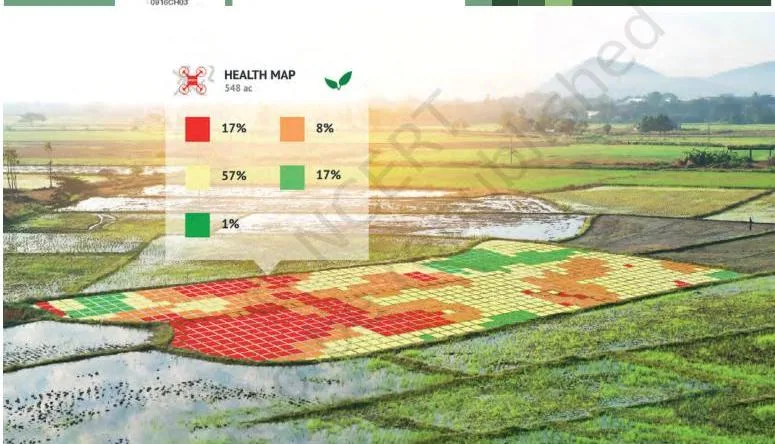
The chapter opens with a field photographed from a satellite or drone, with every small area colour-coded by crop health. Red is the worst health, green is the best. In this map, 17 per cent of the crops are in poor health and only 1 per cent is in good health, with the rest in between (NCERT p. 39).
A farmer reads this map and sends water, fertiliser or pest control only to the small areas that need it. That is the whole idea of precision farming in one picture.
Low-tunnels: growing summer vegetables in winter
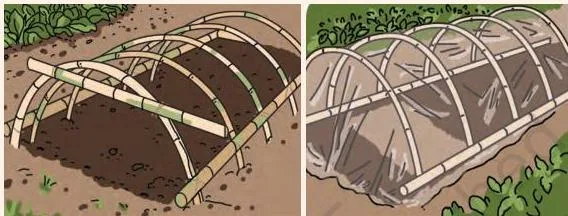
The caselet describes Grade 9 students visiting farmers who grow summer vegetables — tomatoes and cucumbers — in harsh winter using low-tunnels. The tunnels are hoops covered with polythene, creating a greenhouse effect that protects crops from cold weather (NCERT p. 43–44).

The layout: the plan before the build
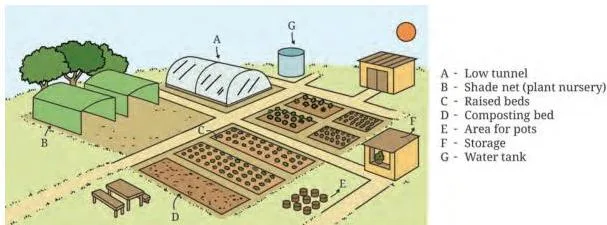
The layout is the whole unit on paper before anything is built: raised beds, a low-tunnel, a pot area, a water tank and storage in one sketch. The chapter’s rules say to mark plant beds, a space for the humidity chamber, the water tank and pump, pathways and storage, and to keep space for composting (NCERT p. 45).
Making this sketch with accurate dimensions is one of the portfolio checkpoints (NCERT p. 46).
Building the low-tunnel in steps
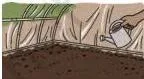
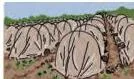
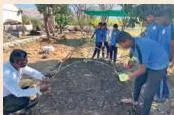
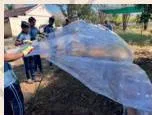
The three pictures show the build order. Step 1: create the frame from bamboo, wood or metal rods. Step 2: cover it with transparent polyethylene sheets to trap heat and moisture. Step 3: spread a 1:1 layer of sand and compost at the base, and sprinkle it with water to raise humidity (NCERT p. 50).
Step 4 is ventilation: small openings or roll-up sides let air flow so the tunnel does not overheat. You can also place trays of water inside, mist with a bottle, and check conditions with a hygrometer or a DIY thermometer (NCERT p. 50).
Three ways to make a humidity chamber
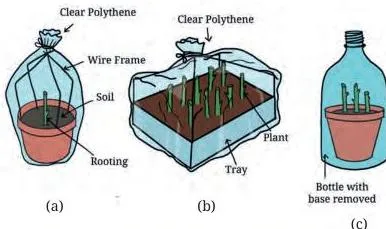
The three sketches show the same idea with materials you already have: a clear polythene bag over a pot, a bag over a tray, or a pot inside a clear bottle whose bottom has been cut off. Each keeps air still and moist around young plants, which is what seedlings need before their roots develop (NCERT p. 49–50).
A DIY weather monitor for the chamber
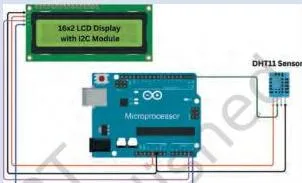
A humidity chamber only works if you know what is happening inside it. The DIY weather monitor uses simple sensors with a programming board to record temperature and humidity inside the chamber (NCERT p. 51). The chapter points to the Grade 8 Home Automation project in Kaushal Bodh for the circuit.

The drip irrigation system
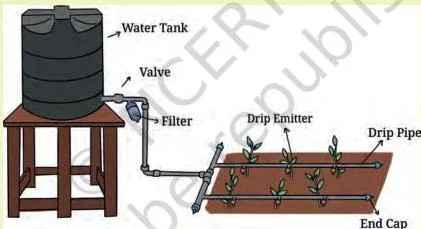
This figure shows how a drip system is laid out. Main pipes and smaller lateral pipes run along the beds; drippers sit near the roots; a tank or pump supplies the water; a filter stops clogging; valves control flow to each section; and nutrients dissolved in the tank turn the same system into fertigation (NCERT p. 52).

Soil-moisture sensor: watering on demand
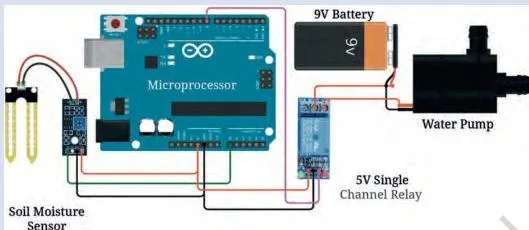
The soil-moisture sensor is what makes drip irrigation precision rather than just water-saving. It reads how wet the soil is, and the system waters only when needed and in the amount needed (NCERT p. 52–53).
Organic carbon in soil: the compost calculation
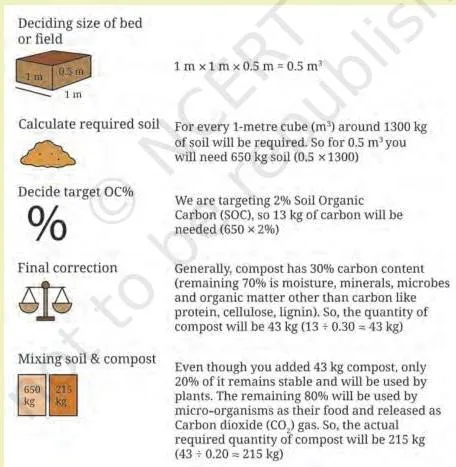
Once the peroxide test tells you the soil’s current carbon level, this figure shows the calculation that follows: how much compost brings the soil up to the 1.5 to 2.0 per cent organic-carbon target (NCERT p. 54). The point is that compost is a measured dose, not a random handful.
LAB culture: six steps to a biofertiliser

The six panels are the whole recipe. Wash rice and keep only the rinse water from the first two washes. Pour it into a clean jar two-thirds full, cover with muslin cloth, and keep it at room temperature away from sunlight for 3 to 5 days without moving it.
When a floating mat forms, pour out only the cloudy liquid beneath it — that liquid carries the wild lactic acid bacteria. Mix one part of that liquid with ten parts milk in a clean jar, cover it, and keep it in a dark place for 3 to 5 days (NCERT p. 55–56).
The contents separate into curds and a yellowish liquid. Pour off the yellow liquid and store it in a clean bottle — that is the active LAB culture. Step 6 is the dilution before use: mix 1 L of culture in 9 L of water and apply through drip irrigation or direct application (NCERT p. 56).
The dilution is a fixed ratio: one part culture to nine parts water, making ten parts of solution. If you have 250 mL of active culture, multiply by 9 to get \( 250 \times 9 = 2250 \) mL of water, so \( 250 + 2250 = 2500 \) mL — that is 2.5 L of ready solution. Apply it through drip irrigation or by direct application.
LDR sensor for the insect trap
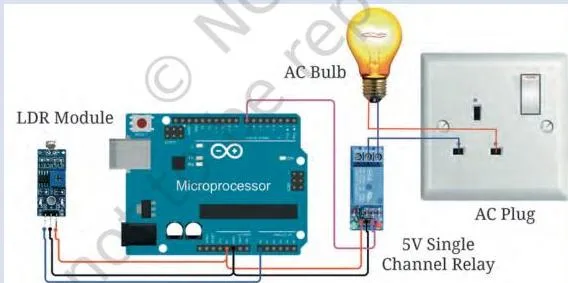
The light trap attracts night-flying insects so you can identify them. The LDR — light dependent resistor — automates the trap by sensing light: it switches the trap on at night and off during the day (NCERT p. 57). The same sensor reappears in storage, where it can detect a door left open or too-bright sunlight and pull down shades automatically (NCERT p. 58).
Precision farming terms students need to know
The chapter introduces its vocabulary in a fixed order: structures first, then sensors, then living inputs. The table below gives each term a one-line meaning and the page where the chapter uses it.
| Term | Plain meaning | NCERT page |
|---|---|---|
| Precision farming | Using science and technology to improve yield while caring for the environment; giving plants exactly what they need | p. 40 |
| Agro-climatic data | Information about a region’s climate — temperature, rainfall, humidity — used to choose plants and protection | p. 41, 44 |
| Greenhouse | A structure that controls temperature and protects crops from rainfall and frost | p. 44 |
| Low-tunnel | Hoops covered with polythene that trap solar heat to raise temperature and extend the growing season | p. 44, 50 |
| Humidity chamber | A small, moist enclosure for germinating seeds and rooting cuttings | p. 49 |
| Shade-net | A net cover that protects plants from high temperature and scorching heat | p. 44 |
| Drip irrigation | Watering drop by drop to the root zone through small drippers | p. 51 |
| Fertigation | Supplying dissolved nutrients together with irrigation water in a measured amount | p. 52 |
| Soil moisture sensor | A device that detects soil wetness and automates watering | p. 53 |
| Organic carbon | Carbon in soil from decomposed matter; the healthy target is 1.5 to 2.0 per cent | p. 53 |
| Biofertiliser | A fertiliser made from beneficial micro-organisms such as bacteria, fungi and algae | p. 55 |
| LAB culture | Lactic acid bacteria grown from rice rinse water and milk, used as a biofertiliser | p. 56 |
| Light trap | An eco-friendly trap that uses light to attract and identify night-flying insects | p. 57 |
| LDR sensor | A light dependent resistor that switches the insect trap on at night and off by day | p. 57 |
Common mistakes when setting up a precision farming unit
Most mistakes come from choosing a structure that fights the wrong weather problem, or from rushing the living organisms. The chapter warns about both, often explicitly.
| Mistake | Correct rule | How to check |
|---|---|---|
| Picking a low-tunnel where the problem is heat | A low-tunnel raises temperature; use a shade-net for scorching heat | Match the weather problem to Table 3.4 before building (p. 44) |
| Sealing the low-tunnel completely | It must breathe — small openings or roll-up sides prevent overheating | Use the Step 4 ventilation options shown in Figure 3.6 (p. 50) |
| Shaking or moving LAB jars, or leaving them in sunlight | Fermentation needs stillness and darkness; containers must be clean | Keep jars undisturbed 3 to 5 days, away from direct sun (p. 55–56) |
| Using all the rice rinse water | Use only the water from the first two washes | Discard the later washes before fermenting (p. 55) |
| Handling hydrogen peroxide without protection | Wear safety gear — the reaction releases oxygen gas | Follow the safety note in Step 2 of the soil test (p. 53) |
| Reading the bubbling test backwards | No bubbling means very low carbon; intense foam means good carbon | Compare your observation with Table 3.8 (p. 53) |
| Skipping the filter unit in drip irrigation | A filter prevents clogging of pipes and drippers | Step 4 of the drip set-up includes the filter (p. 52) |
| Trying to eliminate all insects | Insects belong to the ecosystem — manage the population, don’t wipe it out | Aim for pest management, not elimination (p. 57) |
How this chapter is assessed: portfolio, tasks and self-check
In a skill module, the evidence of learning is the work you do — not a set of recall questions. The chapter marks its checkpoints as you go, and its closing Assess your learning section (NCERT p. 59–60) asks for reflection and examples, not memorised answers.
- Portfolio: justify your choice of plants after the scoping decisions (p. 42).
- Portfolio: complete the site-visit observations and create the process chart (p. 43).
- Task: collect weather data and choose the crop protection method; Check Your Understanding caselet on monsoon data (p. 44–45).
- Portfolio: sketch the layout with accurate dimensions (p. 46), then build a Bill of Materials (p. 49).
- Task: observe germination and growth of seedlings in the humidity chamber, keeping a temperature and humidity record (p. 51).
- Task: identify the insects collected in the light trap using the NPSS app (p. 58).
The process chart (Table 3.2, NCERT p. 42–43) is the organising document for the whole project. The roadmap below shows the stages in order, with the checkpoints marked.
| Stage | What you produce | Checkpoint |
|---|---|---|
| 1. Scoping | Decisions: where, which plants, which technology | Portfolio: justify plant choice (p. 42) |
| 2. Process chart | Task list with dates and responsibility | Portfolio: create the chart (p. 43) |
| 3. Weather data | Protection-method decision from Table 3.4 | Task and caselet (p. 44–45) |
| 4. Layout | Sketch with accurate dimensions | Portfolio (p. 46) |
| 5. Bill of Materials | Cost estimate before buying anything | Portfolio (p. 49) |
| 6. Building | Humidity chamber, low-tunnel, drip system | Task: germination record (p. 51) |
| 7. Soil and compost | Measured organic carbon from the peroxide test | Figure 3.10 calculation (p. 53–54) |
| 8. Biofertiliser | LAB culture ready to dilute | Steps 1–6 (p. 55–56) |
| 9. Pest management | Light trap, LDR automation, NPSS identification | Task: identify insects (p. 58) |
| 10. Harvest | QR-labelled, stored produce | Harvest and storage notes (p. 58) |
Textbook contents and the examinable syllabus are not always identical — check the current official CBSE skill-education syllabus for how this module is assessed in Class 9.
Quick recap: the six decisions of a precision farming unit
The chapter’s closing checklist (section 3.12, NCERT p. 59) is the whole project in six decisions.
- Choose the plants — from your region’s agro-climatic data (p. 41).
- Choose the protection structure — from weather data: greenhouse, low-tunnel, humidity chamber or shade-net (p. 44).
- Raise healthy seedlings — in a humidity chamber or precision nursery (p. 49).
- Test the soil and add measured compost — to reach 1.5 to 2.0 per cent organic carbon (p. 53–54).
- Maintain the plants — with sensors, micro-irrigation and biofertilisers (p. 51–53, 55).
- Harvest, package and store with data — and label with a QR code (p. 58).
The one-line idea of the chapter comes from its own definition of precision: exactly as required — the right amount, at the right time, every time (NCERT p. 40).
Related resources
This listing is maintained for the 2026-27 academic session using the NCERT textbook information available to us. NCERT remains the authority for confirming the latest edition.
This chapter builds straight on Chapter 1 of the same book — the agro-climate relationship, the school meteorological observatory, and soil texture and pH tests (NCERT p. 41, 44, 53) — and follows the Chapter 2 project on rooftop gardening. The next chapter carries the skill forward.
- Rooftop Gardening Class 9 notes — the previous chapter in the Kaushal Vikas book.
- Kaushal Vikas additional vocations chapter 4 — the next chapter.
- Class 9 Skill Education notes — the hub for this book, including Chapter 1’s agro-climate and soil topics.
- Class 9 notes hub — all subjects for Grade 9.
- CBSE notes home — every class and subject.
For the weather-data task, the chapter suggests the Indian Meteorological Department website at mausam.imd.gov.in, alongside your school observatory and the local Krishi Vigyan Kendra (NCERT p. 44).
Sources and data verification
This page describes the NCERT Kaushal Vikas (Skill Education) textbook for Grade 9 — Chapter 3, Precision Farming, on NCERT pages 39–60 of the official edition available from ncert.nic.in. It covers this one chapter, not the full book and not the whole CBSE skill-education scheme.
This listing is maintained for the current academic session using NCERT’s published edition. NCERT settles textbook editions and PDFs; CBSE settles curriculum, syllabus and examinations. Textbook contents and the examinable syllabus are not always identical.
| What the chapter holds | Count | Where it is used |
|---|---|---|
| Printed pages | 22 | |
| Sections in the chapter | 21 | |
| Figures with NCERT captions | 30 | |
| Tables | 13 | |
| Worked examples | 3 | solved step by step in our NCERT Solutions |
| Official NCERT PDF | Download the chapter PDF | the chapter exactly as NCERT publishes it |




Frequently asked questions
What is precision farming for Class 9?
The chapter defines precision farming as the use of science and technology to improve agricultural yield while caring for the environment (NCERT p. 40). “Precision” means “exactly as required and consistent — the same every time.” So in practice, the grower gives plants exactly the right water, nutrients and care, at the right time and in the right amount.
What is the difference between traditional and precision farming?
Traditional farming relies on experience and treats the whole field alike — flood irrigation, broadcast sowing, estimated doses. Precision farming measures and decides: structures control the climate, machinery sows at proper spacing and depth, micro-irrigation is guided by soil-moisture sensors, and fertiliser and pest decisions come from soil analysis and app data (Table 3.1, NCERT p. 40).
Which crop protection method should I choose for my area?
Collect temperature, rainfall and humidity data first, then match the biggest problem to Table 3.4 (NCERT p. 44). Cold weather or frost and heavy rain point to a greenhouse; scorching heat to a shade-net; a short winter growing season to a low-tunnel; and nursery seedlings that need steady moisture to a humidity chamber.
How do you make a humidity chamber for a plant nursery?
Three DIY methods are shown in Figure 3.5 (NCERT p. 50). Place a clear polythene bag over a pot, place one over a tray, or put the pot inside a clear bottle whose bottom has been cut off. Each traps moisture so seeds germinate and cuttings root before the plant has a developed root system.
How is LAB culture prepared and used as a biofertiliser?
Use the rinse water from the first two washes of rice, ferment it in a clean covered jar for 3 to 5 days away from sunlight, then mix one part of the cloudy liquid with ten parts milk (NCERT p. 55–56).
After another 3 to 5 days in a dark place, pour off the yellow liquid — the active LAB culture. Dilute 1 L of culture in 9 L of water and apply through drip irrigation or directly (NCERT p. 56).
Is Precision Farming part of the Class 9 skill education syllabus?
Precision Farming is NCERT Chapter 3 of Kaushal Vikas for Grade 9. Textbook contents and the examinable syllabus are not always identical, so check the current official CBSE skill-education syllabus for Class 9 to see how this chapter is assessed at your school.
Reference: NCERT Class 9 Kaushal Vikas (Skill Education) textbook, chapter 3, official edition on ncert.nic.in.
Explore Class 9 Skill Education Books
- Previous: Rooftop Gardening
- Next: Additional Vocations
Related chapters:
- Work with Life Forms
- Work with Machines and Materials
- Construction