
Looking for the apparel class 9 chapter PDF or a clear map of what the chapter contains? This page covers Chapter 7 Apparel of the NCERT Kaushal Vikas (Grade 9) Skill Education textbook, which runs from NCERT page 113 to 132.
The official PDF is right below, followed by a section-by-section map, the key ideas with page references, and the mistakes the book warns you about before you start cutting.
NCERT Class 9 Kaushal Vikas Chapter 7 Apparel PDF
This is the official NCERT file for Chapter 7 Apparel of the Kaushal Vikas (Grade 9) Skill Education textbook, printed on NCERT pages 113 to 132. The PDF gives you the full chapter as published — every figure, table, safety box, portfolio task and “Assess your learning” question — so you can read it on any device and follow along while you work.
Open the NCERT Class 9 Kaushal Vikas Chapter 7 Apparel PDF to read the whole chapter with all its figures and tables exactly as NCERT published it, then come back to this page for the explanations. The file comes from NCERT’s official textbook portal, so it matches the printed book.
Chapter 7 Apparel at a glance
Before you open the file, here is what kind of chapter this is. It is a practical, project-based chapter: the whole of it moves through one apparel-making project, from deciding what to make to packing and labelling the finished product. The tables below show the kinds of content you will meet inside it.
| Inside the chapter | What it is for |
|---|---|
| Project sequence | The chapter is one continuous project: scope the work, plan, measure, draft, cut, stitch, finish, pack and label. |
| Caselets | Three Grade 9 groups make a cushion cover, an apron and a young child’s dress; their drawings, patterns and bill of materials appear as working examples. |
| Portfolio tasks | You collect a stitch sampler, paper pattern, process photos, finished product and a designed label. |
| Safety boxes | Measurement rules, tool safety and sewing machine safety. |
| Did You Know | Upcycling ideas that turn old clothes into new, useful products. |
| Technology and AI | A note on using CAD software for the technical drawing. |
| Check Your Understanding | Figure-based questions that train you to spot marking, cutting and stitching errors. |
| Assess your learning | Eight questions at the end that check skill, reasoning and reflection. |
It is a doing chapter, not a reading chapter: most of the learning happens with needle, thread, chalk and fabric in hand.
What the Apparel chapter teaches you
This map follows the chapter in order so you know where each skill is taught and can jump straight to the part you need. Each row names the section, what you do there, and the NCERT page.
| Section | What you do there | NCERT page |
|---|---|---|
| 7.1 Introduction | See clothing as a basic need and as cultural expression; meet the textile, apparel and fashion chain. | p. 114 |
| 7.2 Scoping work and process chart | Decide the product, resources and user; plan tasks, dates and responsibility. | p. 115 |
| 7.3 Site visit | Observe and talk to practitioners; take notes on tools, processes, safety, schedules and quality. | p. 116 |
| 7.4 Technical drawing of apparel | Visualise the design; measure the user accurately; learn bespoke vs ready-made sizes. | pp. 117–118 |
| 7.5 Selecting materials | Choose fabric by its properties and thread to match. | p. 120 |
| 7.6 Selecting tools | Match tools to jobs and learn the safety note for each. | p. 120 |
| 7.7 Bill of Materials | Estimate cloth length including seam clearance; cost materials and labour. | pp. 121–122 |
| 7.8.1 Sewing | Practise the five hand stitches on a sampler. | pp. 123–124 |
| 7.8.2 Drafting | Mark measurements on paper and build a full-size paper pattern. | p. 125 |
| 7.8.3 Preparing fabric | Pre-wash, dry and press fabric; fold so the selvages meet. | p. 126 |
| 7.9 Marking and cutting fabric | Place the pattern along the fabric length, trace with seam allowance, cut with long smooth strokes. | pp. 126–128 |
| 7.10 Sewing the product | Stitch seams at a steady pace; secure the ends with backstitches. | p. 128 |
| 7.11 Finishing the product | Trim or overlock raw edges; hem neatly; decorate the surface. | pp. 129–130 |
| 7.11.1 Packaging and labelling | Pack for protection and presentation; design a care label. | p. 130 |
| 7.12 While making apparel | A recap list of the chapter’s good practices. | p. 131 |
| 7.13 Assess your learning | Eight questions that test choice, reasoning, reflection and real-life application. | p. 131 |
Key ideas in the Apparel chapter
These are the ideas that make the practical tasks work. Each one below is explained in plain words with the page where the book teaches it.
The apparel project as a six-stage process map
The whole chapter is one project in six stages. Keep this map in your head and every task in the book will have a place.
- Scope the work (p. 115) — decide what you will make, what resources you have, and who will use it and how it must stay comfortable, strong and easy to maintain.
- Plan the work (pp. 115, 121–122) — make a process chart of tasks with dates and responsibility, then a bill of materials with costs.
- Design and draft (pp. 117–118, 125) — measure accurately, make a technical drawing, and draft a full-size paper pattern.
- Prepare, mark and cut (pp. 126–128) — pre-wash, press and fold the fabric; place the pattern along its length; mark with seam allowance; cut with long smooth strokes.
- Stitch and finish (pp. 128–129) — sew at a steady pace, secure seam ends with backstitches, finish raw edges and hem.
- Pack, label and reflect (pp. 130–131) — pack for protection and presentation, design the label, and add process notes to your portfolio.
Concepts that carry the whole chapter
- Apparel is more than protection (p. 114): clothing began as protection from weather, but today it also reflects personality, culture and fashion.
- Three connected industries (p. 114): the textile industry produces fibre, yarn and fabric; the apparel industry designs and manufactures clothing; the fashion industry creates unique, branded, occasion-specific clothing. Each influences the other.
- Scope before you sew (p. 115): list your resources and experts, decide the product, and ask whether the user will find it comfortable, strong and easy to maintain.
- Measure accurately or the fit fails (p. 117): measure over thin clothing with a flexible tailoring tape, the person standing straight and relaxed, the tape neither too loose nor too tight. Bespoke apparel is custom-made for one customer; ready-made apparel uses standard sizes.
- Seam allowance is extra cloth (p. 118): leave extra fabric for seams and finishing while marking, otherwise the stitched garment comes out smaller than the pattern.
- Fabric is chosen by properties (pp. 119–120): cotton is soft and breathable, wool is breathable and wrinkle-free, silk is soft and shiny but expensive, linen is one of the strongest natural fibres. Choose the fabric that matches the garment’s job.
- Every tool has a safety note (p. 120): scissors by the blade end, pins inserted carefully, iron under supervision, sewing machine only supervised — and a thimble on the finger that pushes the needle.
- The bill of materials includes labour (pp. 121–122): estimate cloth length based on roll width plus seam clearance, and add the cost of labour hours so you understand the real value of the work.
- Draft full size (p. 125): apparel patterns are drawn with actual measurements, not reduced to a scale, because the pattern is placed directly on fabric and traced.
- Prepare fabric first (p. 126): pre-wash, dry and press before cutting so shrinkage happens before sewing and marking stays accurate.
- Cut along the fabric length (pp. 126–127): placing the pattern straight along the length gives strength and durability; a pattern placed across it makes a weak, short-lived garment.
- Secure every seam (p. 128): a few backstitches at the beginning and end of a seam stop it from opening during use or washing.
- Finish what you stitch (p. 129): trim or overlock raw edges so they do not fray, and hem the bottom, sleeves and neck for durability and a neat look.
The five hand stitches and the best job for each
Before touching a sewing machine, the chapter makes you competent with needle and thread. Table 7.7 (p. 123) gives five stitches and exactly when to use each.
| Stitch | Best used for | Example in the chapter |
|---|---|---|
| Running stitch | Temporary stitching, joining layers, simple seams | Putting on an apron pocket |
| Backstitch | Strong seams, repairs, outlines | Apron straps; repairing a torn bag seam |
| Split stitch | Embroidery and outlining designs | Embroidering cushion cover or dress outlines |
| Buttonhole stitch | Buttonholes and stopping fabric edges from fraying | Dress buttonholes; securing a bag flap edge |
| Hemming stitch | Finishing hems of garments | Bottom edge of an apron; a skirt hem |
Choosing fabric by properties
Table 7.4 (p. 120) pairs each apparel with the fabric that suits it and states the reason. Learn the pairings, not just the names.
| Apparel | Suitable fabric | Reason for selection |
|---|---|---|
| T-shirt | Cotton | Soft, breathable, comfortable for daily wear |
| School uniform | Polyester-cotton blend | Durable, easy to wash, wrinkle-resistant |
| Dress | Cotton, rayon | Soft, breathable, comfortable for daily wear |
| Baby dress | Soft cotton, muslin | Soft, breathable and gentle on the skin |
| Kitchen apron | Thick cotton, polyester | Strong, washable, protects clothes |
An original bill of materials worked example
This example uses the chapter’s own cost-sheet format (Table 7.6, pp. 121–122) but new numbers, for a practice apron. NCERT’s students priced a child’s dress at ₹610 including labour; here is a smaller project.
| Item | Quantity | Estimated cost (₹) |
|---|---|---|
| Main fabric (thick cotton) | 1 m | 120 |
| Contrast fabric (pocket) | 0.25 m | 35 |
| Thread roll | 1 roll | 25 |
| Buttons (fastening) | 4 | 12 |
| Lace (optional decoration) | 0.5 m | 15 |
| Labour — measuring and sketching | 1 × ₹50 | 50 |
| Labour — cutting and stitching | 2 × ₹50 | 100 |
| Total | 357 |
Notice the two things the chapter insists on. First, the book asks you to estimate “seam clearance” — extra cloth for stitching and hemming edges — so the pocket fabric above is planned cloth, not wastage (p. 122). Second, labour hours are valued in money, because that is where a beginner learns the true cost of a garment.
Apparel chapter figures explained
The figures in this chapter are instructions, not decoration. Each one below shows a step you will perform or a result you should aim for; read the caption and the line under it before you begin that task.
The opening: apparel as craft and industry
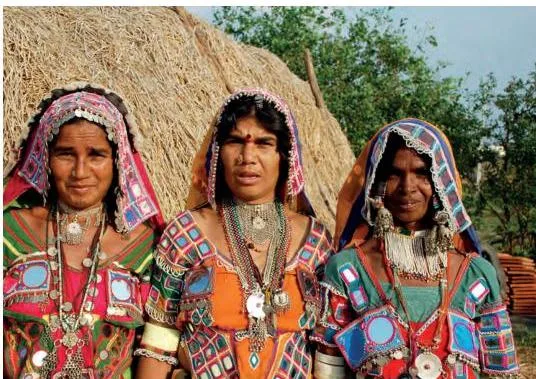
Figure 7.1 (p. 113) opens the chapter with one big idea: apparel is both a basic need and a carrier of culture. The caption notes that making this traditional clothing is labour-intensive, the skill passes down generations, and designers now work with these communities to create embroidered jackets, dresses and accessories.
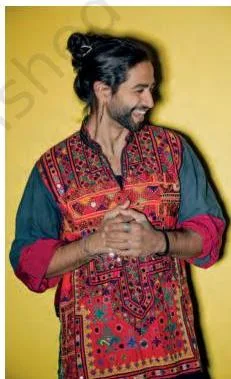
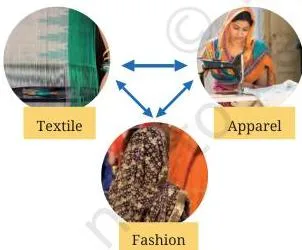
Figure 7.2 (p. 114) maps the three-industry chain. The book’s own example of the linkage: when synthetic fibres became popular, traditional weaving gave way to industrial looms, and when traditional weaving became fashionable again, it was revived.
Upcycling: two ways to reuse fabric
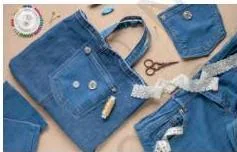
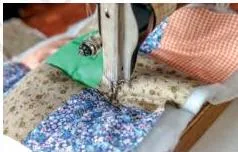
Figures 7.3 and 7.4 (p. 115) are the chapter’s upcycling examples. An old pair of jeans can become a sling bag with added patchwork and mirror work; fabric scraps can be stitched into a colourful patchwork table runner or wall hanging. Keep these ideas for the “Assess your learning” question that asks for ten uses of an old dress.
Measurement and design
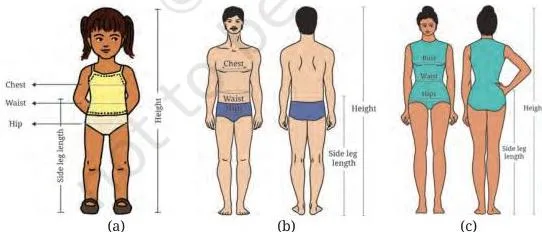
Figure 7.5 (p. 117) is where fit is won or lost. It shows the body points to measure — chest/bust, waist, hips, shoulder, sleeve and length, listed in the QUALITY box on p. 118. A cushion cover is a simple square or rectangle to measure; the human body is not, which is why the book gives you body-point diagrams.
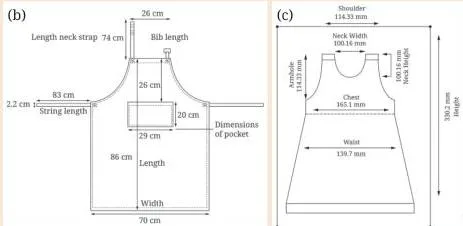
Figure 7.6 (p. 119) shows the three products the caselet groups chose: cushion covers to replace the worn-out ones outside the Principal’s office, an apron for the person serving the midday meal, and a dress for younger siblings.

Your portfolio task asks for the same standard: a neat technical drawing, exact measurements, all parts labelled, and notes on fabric, thread and special features.
Practice and planning on paper
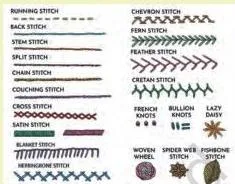
Figure 7.8 (p. 124) is the sampler. Before stitching a real product, the chapter makes you practise on a sample so your hand learns steady tension. The TASK also suggests repairing an old garment or stitching small covers for water glasses from recycled cloth, and the sampler image goes into your portfolio.
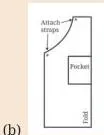
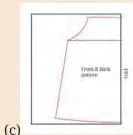
Figure 7.9 (p. 126) shows the same three products one stage later: sketched first, then drafted full size, then cut out as reusable patterns. Each part — front, back, strap, pocket — must be labelled so the pieces never get mixed up.
Two figures in the chapter are deliberately wrong so you can practise spotting errors: Figure 7.10 (Uneven marking and cutting of fabric) and Figure 7.12 (Samples of sewing). Both are shown and explained in the common mistakes section below, because that is exactly where the book tests you on them.
Sewing, packing and labelling
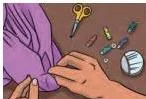
Figure 7.11 (p. 128) makes the point about posture and pace: keep the work flat, guide the needle along the marked line, keep stitches straight and even, and pull the needle away from yourself. On a machine, let the fabric feed itself at a steady pace — pulling it makes stitches slip or gather.
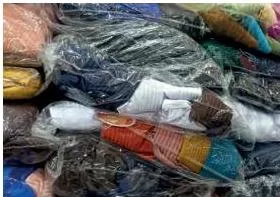
Figure 7.15 (p. 130) treats packing as the last production step, not an afterthought: it protects the product from dust, dirt and damage, and presents it professionally. The chapter pairs packing with labelling, because the label is the primary communication between manufacturer and customer.
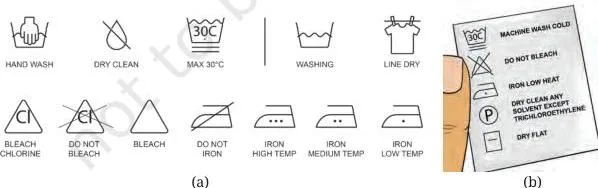
Figure 7.16 (p. 130) teaches you to read a care label. Part (a) shows symbols commonly used on apparel labels; part (b) shows a complete label telling the customer the size and how to keep the garment fresh.
The book’s specific warning: the label instructs that trichloroethylene, a spot remover, must not be used because it has carcinogenic properties — and this is exactly the kind of honest care information your own label should pass on.
Apparel terms you need to know
These terms appear in the tasks and portfolio work. Each definition below is in plain words, with the NCERT page where the term appears, so you can check the book when a task uses it.
| Term | What it means | NCERT page |
|---|---|---|
| Apparel | Clothing, especially clothes made by designing, cutting and stitching fabric. | p. 114 |
| Textile industry | The industry that produces fibre, yarn and fabric. | p. 114 |
| Fashion industry | The industry that creates unique, branded, occasion-specific clothing. | p. 114 |
| Upcycling | Giving new life to old or unused clothes by creatively redesigning them into useful products. | p. 115 |
| Scoping work | Deciding what to make, what resources you have, and who will use the product. | p. 115 |
| Process chart | A table listing the tasks of a project, with dates and the person responsible for each. | p. 115 |
| Technical drawing | A neat drawing of the apparel with exact measurements and all parts labelled. | p. 117 |
| Bespoke | Custom-made for one specific customer. | p. 117 |
| Ready-made | Made in standard sizes and sold directly. | p. 117 |
| Seam allowance | Extra fabric left for seams and finishing while marking the fabric. | p. 118 |
| Drafting | Marking measurements and drawing the shape of the product on paper. | p. 125 |
| Paper pattern | A cut-out draft, placed on fabric and traced; reusable each time so every piece is the same shape. | p. 125 |
| Selvage | The finished side edge of the fabric; the two side edges meet when fabric is folded lengthwise. | p. 126 |
| Bill of materials | An itemised list of materials with quantities and estimated costs, including labour hours. | pp. 121–122 |
| Hemming | Finishing the bottom, sleeve and neck edges of a garment neatly. | p. 129 |
| Overlocking | Finishing raw edges of the seam allowance so they do not fray. | p. 129 |
| Surface decoration | Making the product attractive through embroidery, painting, patchwork, tie-and-dye, block printing, quilting or bead, lace and sequin work. | p. 130 |
| Labelling | Telling the customer the size of the apparel and how to care for it. | p. 130 |
Common apparel-making mistakes and how to avoid them
The chapter gives its cautions inside the steps and then tests them in “Check Your Understanding”. These are the mistakes a beginner actually makes — read them before you pick up the scissors.
| Mistake | Correct rule | How to check your work |
|---|---|---|
| Measuring over thick clothing | Measure over thin clothing, with the person standing straight and relaxed and the tape neither too loose nor too tight. | Check that the person wears thin clothes and the tape lies flat, not strained. |
| Forgetting seam allowance while marking | Leave 1–2 cm extra fabric for seams and hemming when tracing the pattern. | Look for the chalk line offset from the pattern edge, not exactly on it. |
| Placing the paper pattern across the fabric instead of along its length | Place the pattern straight along the fabric length; this gives strength and durability. | Check that pattern edges run parallel to the fabric’s long edges and the selvage. |
| Cutting with small snips or angled blades | Make long, smooth strokes; keep the scissors parallel to the surface and watch the blade tip. | The cut edge should be continuous and smooth, not jagged. |
| Skipping pre-wash and pressing | Pre-wash, dry and press before cutting so shrinkage happens first and marking stays accurate. | Ask: has the fabric been washed once and ironed smooth? |
| Uneven or loose stitches | Keep stitch length and tension even — neither too tight nor too loose. | Run a finger along the seam; stitches should be uniform and hold the layers together. |
| Pulling fabric while machine sewing | Sew at a steady pace and let the machine feed the fabric; do not pull it. | The seam should follow the marked line without slipping or gathering. |
| Leaving raw edges unfinished | Trim or overlock raw edges and hem the bottom, sleeves and neck. | Look inside the garment: no fraying edges, and hems are neat. |
What Figure 7.10 shows: uneven marking and cutting
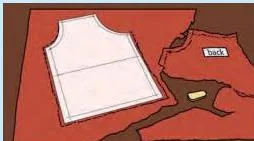
Figure 7.10 (p. 128) is the chapter’s “spot the error” picture. The hint tells you exactly where to look: at the placement of the paper pattern and the way the fabric has been cut.
The errors to name are the pattern placed across the fabric length instead of along it, marking without a clear seam allowance, and cutting that strays from the marked line.
What problems follow? The pieces will not match at the seams, the apparel loses strength and durability because the grain runs wrong, fabric is wasted, and the finished product looks uneven.
The correction is simply the correct procedure: reset the pattern along the length, re-mark with 1–2 cm seam allowance, take feedback from the teacher or expert before cutting, then cut with long smooth strokes keeping the scissors parallel.
What Figure 7.12 shows: samples of sewing
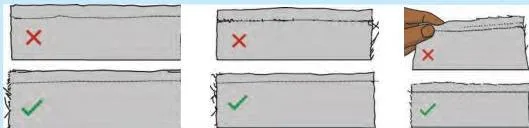
Figure 7.12 (p. 129) shows sewing samples marked correct and incorrect, and the book asks whether you agree. The reasoning comes straight from the sewing rules: stitches that are straight, even, properly tensioned and aligned with the marked line are correct; uneven or loose stitches weaken the seam and spoil the appearance.
During use and washing, those uneven or loose stitches open up and the seam gives way. Correct them by stitching at a steady pace, letting the fabric feed without pulling, keeping tension consistent, and securing each seam end with a few backstitches so nothing unravels.
What the “Assess your learning” section asks you to do
The chapter ends with eight questions (NCERT, p. 131) that test skills, not memorising. Here is what each question wants from you.
| Question | It asks you to | A full answer needs |
|---|---|---|
| 1 | Choose a fabric for a daily-use pajama set (cotton, polyester or a blend). | Name the fabric and justify it with its properties — softness, breathability, durability, ease of washing. |
| 2 | Explain how measuring over thick winter clothes affects an apron and a dress. | Say the apparel becomes too loose or baggy because measurements are inflated, and give the correction: measure over thin clothing, straight and relaxed posture, tape neither too loose nor too tight. |
| 3 | Explain how a paper pattern reduces fabric wastage. | Say the pattern lets you trace the same shape every time, place pieces close together along the edges, recheck before cutting, and reuse the pattern. |
| 4 | Explain why pre-washing and pressing are essential. | Say shrinkage happens before cutting and smooth fabric gives accurate marking and cutting; skipping the step makes the finished garment shrink or pucker at the seams. |
| 5 | Identify problems caused by uneven, loose stitching. | Say seams open during use and washing, strength drops, and appearance suffers; give corrections — even tension, steady pace, no pulling, backstitches at the ends. |
| 6 | List ten uses for an old dress and find out what sustainable fashion is. | Give ten practical reuse ideas (sling bag, patchwork runner or wall hanging, cushion covers, repairs) and define sustainable fashion as reducing waste by reusing, repairing and upcycling clothes. |
| 7 | Reflect on which tasks you enjoyed most and least. | Give honest examples of what went well and what did not, and say what you would do differently next time. |
| 8 | Give examples of applying your learning in real life. | Give a concrete situation — repairing a torn seam, stitching a cover, designing a label, or upcycling at home — and say which skill you would use. |
Note that textbook contents and the examinable syllabus are not always identical — check the current official CBSE syllabus to confirm what is assessed this session.
Apparel making sequence: a one-screen checklist
This is the whole process from the chapter’s own pointers (7.12, p. 131) plus the earlier steps, compressed to one screen. Treat it as the expanded version of the six-stage map above, and tick each item as you finish it.
- Gather information first — visit a tailoring shop or boutique, search online, or interview a fashion designer or tailor (p. 131).
- Scope the work — decide the product, check your resources and time, and understand who will use it and how it must be comfortable, strong and easy to maintain (p. 115).
- Plan with a process chart and a bill of materials — put tasks, dates and responsibility in a chart, and estimate cloth length, seam clearance and labour hours (pp. 115, 121–122).
- Measure and design — take accurate measurements, choose fabric and thread, and make a labelled technical drawing (pp. 117–120).
- Draft a full-size paper pattern — draw on chart paper or old newspaper at actual size and label every part (p. 125).
- Pre-wash, dry and press the fabric — before cutting, so shrinkage happens first and marking is accurate (p. 126).
- Mark and cut — place the pattern along the fabric length, trace with 1–2 cm seam allowance, take feedback, then cut with long smooth strokes keeping the scissors parallel (pp. 126–128).
- Pin and label the cut pieces — keep front and back pinned together and labelled so they cannot be mixed up (p. 127).
- Stitch, then finish — sew at a steady pace, secure seam ends with backstitches, trim or overlock raw edges, and hem neatly (pp. 128–129).
- Pack, label and reflect — pack for protection and presentation, design and attach the care label, and add process notes and photos to your portfolio (pp. 130–131).
Related resources and official NCERT links
This listing is maintained for the 2026-27 academic session using the NCERT textbook information available to us. NCERT remains the authority for confirming the latest edition.
The primary source for everything on this page is the official NCERT textbook portal (ncert.nic.in), which hosts the Kaushal Vikas Grade 9 book; the chapter PDF link above comes from there. The Apparel chapter sits inside the larger skill education programme, so these pages will help you place it:
- Class 9 Skill Education notes — the hub for every skill module in this grade.
- Class 9 study hub — the wider set of Class 9 subjects and notes.
- Construction chapter notes — a Grade 9 skill module that follows the same learn-by-project structure.
- Kaushal Vikas Chapter 8: Additional Vocations — the next chapter in the same book, worth reading after you finish the apparel project.
Sources and data verification
The descriptions on this page refer to the NCERT Kaushal Vikas (Grade 9) Skill Education textbook, Chapter 7 Apparel, official edition published on ncert.nic.in, NCERT pages 113 to 132.
This page covers Chapter 7 of that book only. It does not cover other chapters of Kaushal Vikas, other subjects, or the wider CBSE skill education scheme. It is maintained for the current session using NCERT’s published textbook information; no claim of an external expert review is made.
NCERT settles textbooks, editions and PDFs; CBSE settles curriculum, syllabus and examinations. For anything about what is examinable, check the current official CBSE syllabus.
| What the chapter holds | Count | Where it is used |
|---|---|---|
| Printed pages | 20 | |
| Sections in the chapter | 19 | |
| Figures with NCERT captions | 38 | |
| Tables | 13 | |
| Worked examples | 3 | solved step by step in our NCERT Solutions |
| In-text questions | 4 | |
| Official NCERT PDF | Download the chapter PDF | the chapter exactly as NCERT publishes it |





Apparel Class 9 chapter FAQ
Which fabric does the chapter recommend for a school uniform and why?
A polyester-cotton blend (Table 7.4, p. 120), because it is durable, easy to wash and wrinkle-resistant — the three qualities a uniform is used hard and washed often. Cotton alone is soft but wears out faster and creases; the blend keeps comfort and strength.
Compare the baby dress, where the priority shifts to soft cotton or muslin because gentleness on the skin matters most.
What is seam allowance and why does it matter while cutting fabric?
Seam allowance is the extra fabric you leave beyond the drawn shape for seams and finishing (p. 118). The book tells you to leave 1–2 cm when you trace the paper pattern with tailor’s chalk (p. 127).
Without it, the stitched seam sits on the very edge of the fabric, the garment comes out smaller than the pattern, and the seam pulls open during wear.
Why are apparel patterns drawn full size while construction drawings use a scale?
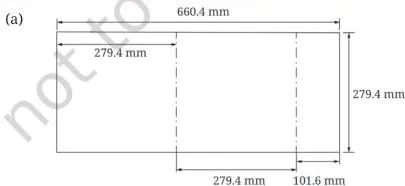
Because the fabric must be cut to the actual dimensions of the user (Table 7.9, p. 125). Construction drawings can use a scale because builders measure from them; an apparel pattern, however, is placed directly on the fabric and traced, so it must be drawn with the real measurements — not reduced or enlarged — or every piece will come out wrong.
What happens if I skip pre-washing fabric before cutting?
The garment shrinks the first time it is washed, so a dress that fitted before the wash becomes tight and the seams pucker or pull (p. 126). Pre-washing lets the shrinkage happen before you cut, and pressing afterwards removes wrinkles so marking and cutting stay accurate.
The book is direct about it: pre-wash and dry before cutting, especially natural fibres like cotton, linen and rayon.
What are the five hand stitches listed in the chapter and when should each be used?
The five are running stitch, backstitch, split stitch, buttonhole stitch and hemming stitch (Table 7.7, p. 123). Running stitch is for temporary stitching and simple seams; backstitch for strong seams and repairs; split stitch for embroidery outlines; buttonhole stitch for buttonholes and stopping edges from fraying; hemming stitch for finishing hems.
The full comparison table with examples sits in the key ideas section above.
What does the care label warning about trichloroethylene mean?
It means a common spot remover must not be used on that garment (Figure 7.16, p. 130). The label in the chapter cautions that trichloroethylene cannot be used because it has carcinogenic properties.
The warning matters because a care label is the manufacturer’s primary communication with the customer — a wrong cleaning method could damage the apparel or harm the person cleaning it, so your own label must pass on care instructions honestly.
Reference: NCERT Class 9 Skill Education (Kaushal Vikas) textbook, chapter 7, official edition on ncert.nic.in.
Explore Class 9 Skill Education Books
- Previous: Construction
- Next: Additional Vocations
Related chapters:
- Work with Life Forms
- Rooftop Gardening
- Precision Farming