
This page gives you Construction Class 9 — Chapter 6 of the NCERT Kaushal Vikas (Skill Education) Grade 9 book, which runs from printed pages 90 to 111 of the textbook. The official chapter PDF is right below, followed by a section-by-section map of what the chapter teaches, its figures, and the practical skills it expects you to build.
Download the NCERT Construction Class 9 PDF
Get the official NCERT Class 9 Kaushal Vikas Construction chapter PDF from the NCERT textbook portal at ncert.nic.in. It is the current official edition of the book, and Chapter 6 is the file you want — open it to read the full chapter text, figures and the Assess Your Learning questions on the last page.
Construction Class 9: Chapter Contents at a Glance
The table below states what the chapter holds — sections, figures, tables and worked examples — rendered directly from the chapter file, so it is the single place those totals appear.
| Contents | Count in Chapter 6 |
|---|---|
| PDF pages | 22 |
| Sections | 23 |
| Figures | 41 |
| Tables | 10 |
| Worked examples (caselets and portfolio tasks) | 4 |
Here is where each main section sits in the printed book, so you can follow along with a finger on the page:
| Section | Printed page |
|---|---|
| 6.1 Introduction | 92 |
| Basic elements of building construction | 93 |
| 6.2 Scoping work | 94–95 |
| 6.3 Site visit | 95–96 |
| Load bearing and RCC construction | 96–97 |
| 6.4 Making a technical drawing | 97–98 |
| 6.5 Selecting materials | 98–100 |
| 6.6 Selecting tools | 100 |
| 6.7 Bill of Materials (brick and mortar estimates) | 101–103 |
| 6.8 Minor repair and maintenance | 104–105 |
| 6.9 Making a structure (bonds, laying, alignment, plastering) | 105–109 |
| 6.10 Finishing the product | 109–110 |
| 6.11 While constructing a structure | 111 |
| 6.12 Assess your learning | 112 |
What the Class 9 Construction Chapter Teaches
Construction is the process of building the structures we live and work in — houses, schools, roads, bridges, dams. This chapter walks you through one complete small construction project, from deciding what to build to painting the finished structure.
- Decide what to build and where (6.2): scoping the work — what will be constructed, whether materials are available, whether it is useful, and where it will sit (NCERT, p. 94).
- Plan the sequence (6.2.2): a process chart lists each task, its date and who is responsible (NCERT, p. 95).
- Visit a real construction site (6.3): observe tools, materials, safety protocols and quality criteria, and talk to practitioners such as masons and engineers (NCERT, pp. 95–96).
- Make a technical drawing (6.4): draw the side view, plan and elevation to a defined scale (NCERT, p. 97).
- Select materials and tools (6.5–6.6): bricks, cement, sand, gravel, water, paint and lime, plus trowels, hammers, spirit levels and plumb bobs (NCERT, pp. 98–100).
- Prepare a Bill of Materials (6.7): estimate bricks and mortar and calculate cost before buying anything (NCERT, pp. 101–103).
- Practise minor repairs (6.8): mix mortar and fill cracks and joints as a rehearsal for real construction (NCERT, p. 104).
- Build the structure (6.9): prepare the ground, lay bricks in a chosen bond, check alignment, then cure and plaster (NCERT, pp. 105–109).
- Finish it (6.10) and follow the safety checklist (6.11) from observation to final painting (NCERT, pp. 109–111).
Page 91 lists what you will actually do by the end of the chapter: prepare a technical drawing, prepare a bill of materials, mark the drawing on the field, prepare the foundation, lay bricks, and complete the structure with curing, plastering, finishing and painting.
Key Concepts: Structural Elements, Load Bearing, Mortar and Bonds
You cannot estimate materials, lay bricks or repair a wall without knowing what each part of a building does. These four concepts are the foundation on which the whole chapter stands.
The six basic structural elements
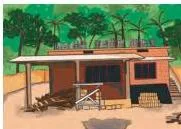
Figure 6.2 on page 93 shows the different parts of any building. Every one of these has a single job, and the jobs connect in order:
- Foundation — the base that carries the building; a strong foundation increases the life of a building, avoids cracks and guards against natural calamities like earthquakes.
- Walls — made of bricks, stones, cement panels, wood, bamboo and more.
- Beams — the horizontal elements that carry the load of the slab or roof; the bigger the load, the bigger the beam.
- Columns — the vertical elements that support the beams and transfer the building’s weight down to the foundation.
- Roofs — the upper element, built with rafters or trusses to carry its own load and protect from weather.
- Windows and doors — the openings that give entry, ventilation, natural light and aesthetic appeal.
Load-bearing vs RCC construction
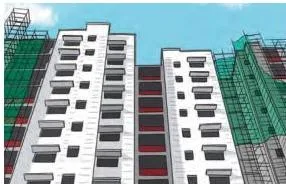
The chapter groups house construction into two types by how the building’s weight reaches the ground (NCERT, p. 96).
| Feature | Load bearing (wall-bearing) construction | RCC (Reinforced Cement Concrete) construction |
|---|---|---|
| What carries the weight | The walls themselves carry the roof and upper parts and transfer load directly to the ground | A skeleton of concrete and steel columns and beams transfers the load to the ground |
| Where it is used | Single-storey houses, places where deep foundations are not needed | Multi-storey buildings and structures that must be very strong and earthquake-resistant |
| Other features | Simple design, lower cost, easy to repair | Walls do not carry the load — the frame does |
Mortar vs concrete
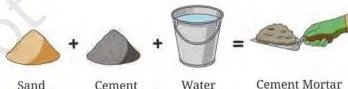
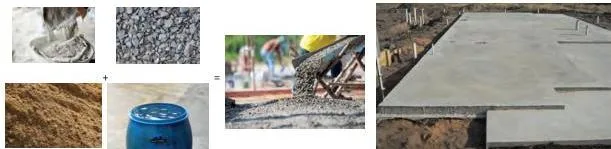
Mortar is the “glue” that binds materials together — it joins bricks, lays stone steps and fixes tiles. Concrete is the material that creates the structure itself and supports weight — ramps, foundations, fences and roads (NCERT, p. 99).
- Mortar = sand + water + cement + lime. It is more flexible than concrete, so it allows slight movement without cracking.
- Concrete = sand + water + cement + gravel or crushed stones. It hardens over time into a strong, stone-like, durable material.
- Concrete reinforced with steel bars (RCC) supports huge structures like skyscrapers.
The four brick bonds
A bond is the pattern in which bricks are laid with mortar. The pattern decides how strong and stable the wall is (NCERT, p. 105).
| Bond | What the wall shows | Best suited for |
|---|---|---|
| Stretcher bond | Length of the brick facing the front | Boundary walls, partitions with a short span, walls of half-brick thickness |
| Header bond | Width of the brick facing the front | Thick walls and curved walls |
| English bond | Alternate rows of stretcher and header | Among the strongest bonds; used mainly for wall-bearing structures |
| Flemish bond | Alternate stretcher and header in each row | Decorative yet strong walls |
How the Chapter Estimates Bricks and Mortar
Before you buy anything, you must know how much of it you need. The Bill of Materials (BoM) helps you estimate costs in advance and avoid waste by buying only what is necessary (NCERT, p. 101).
The standard brick size
In India, the standard size of a brick is 190 × 90 × 90 mm. Because mortar (about 10 mm) is applied between bricks, the chapter treats each brick as occupying 200 × 100 × 100 mm in the estimate (NCERT, p. 101). Bricks are typically made to Bureau of Indian Standards (BIS) specifications.
Volume-based estimation with 10 per cent wastage
The method is simple: building a brick structure means filling a 3D space. Compare the total volume of the structure with the space one brick occupies — that gives the brick count. Because some bricks break or must be cut, engineers add 10 per cent to the total (NCERT, p. 101).
Worked example: a garden planter
Try this with new dimensions — a small garden planter with a triangular cross-section:
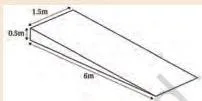
- Height 0.4 m, length 3 m, width 1.2 m (these are original numbers; the textbook’s ramp caselet uses different values).
Step 1: Find the volume of the planter.
\[ \text{Volume} = \left(\frac{1}{2} \times 0.4 \times 3 \right) \times 1.2 = 0.6 \times 1.2 = 0.72\ \text{m}^3 \]
Step 2: Use the rule of thumb that 1 m³ of construction needs 500 bricks.
\[ 0.72 \times 500 = 360 \text{ bricks} \]
Step 3: Add 10 per cent for wastage.
\[ 360 + 36 = 396 \text{ bricks} \]
Final answer: Buy about 400 bricks.
Non-standard brick sizes change the estimate, so always check the size of the brick actually available (NCERT, p. 102).
Mortar ratio quick reference
The correct proportion of cement to sand depends on the job (NCERT, p. 102; plastering ratios on p. 108):
| Use of mortar | Cement : sand ratio |
|---|---|
| Brick masonry | 1 : 3 |
| RCC | 1 : 2 |
| General repair and maintenance | 1 : 3 to 1 : 6 |
| External plastering | 1 : 6 |
| Internal plastering | 1 : 4 |
By rule of thumb, laying 100 standard bricks uses roughly 5–10 kg of cement at a 1:4 or 1:5 ratio — confirm the exact ratio with an expert for your project.
Figure Walkthrough: Reading the Drawings, Bonds and Alignment Tools
The chapter’s diagrams carry information the text alone cannot — how to read a scale drawing, how bonds differ, and what correct alignment looks like. Here is each key figure, read the way a practitioner would.
Figure 6.2 — Basic elements of buildings (NCERT, p. 93)
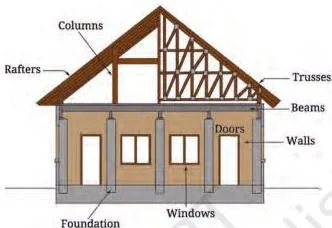
This labelled drawing of a building is your map of the whole chapter. Find the foundation at the bottom, the columns and beams in the middle, and the roof at the top — then notice the windows and doors set into the walls. Every later procedure, from laying bricks to plastering, works on one of these parts.
Figure 6.6 — Elevation, side view and plan of a ramp (NCERT, p. 98)
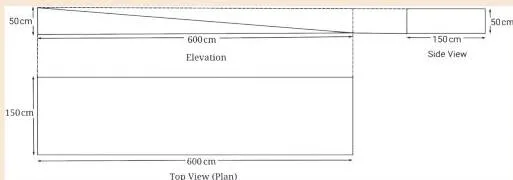
A technical drawing communicates the exact work to be done. This ramp is drawn in three views — elevation (the face), side view (the profile) and plan (from above). Note the scale in the caselet: 1 cm on paper equals 100 cm on the field (1:100), so a 10 m ramp is drawn 10 cm long.
The three views together tell the builder exactly what to mark on the ground.
Figure 6.9 — Dimensions of a typical brick (NCERT, p. 101)
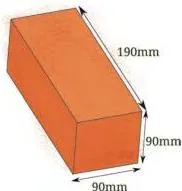
This is the brick whose volume drives every estimate in Section 6.7. Remember the two sizes: the actual brick is 190 × 90 × 90 mm, but estimation uses 200 × 100 × 100 mm because of the 10 mm mortar joint.
Figure 6.11 — Steps for carrying out minor repairs (NCERT, p. 104)
Before building something new, you practise repair: mix one part cement with three parts sand, add water slowly to make a smooth thick paste, clean and lightly wet the surface, apply the mortar with a trowel, then press, level and smoothen. This is your rehearsal for real brickwork.
Figure 6.12 — Different methods of laying bricks (NCERT, p. 105)
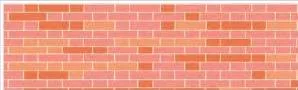
Look at which face of the brick points outward — that is the difference between the bonds. Stretcher shows the length, header shows the width, English alternates whole rows, and Flemish alternates within each row.
Figure 6.17 — Plumb bob, spirit level and water level tube (NCERT, p. 107)
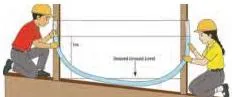
The three alignment tools answer three questions: Is the wall perfectly vertical? (plumb bob.) Is the surface perfectly horizontal? (spirit level.) Are two distant points at the same height? (water level tube.) If any of these is off, gravity slowly weakens the structure.
Figure 6.19 — Applying plaster on the wall (NCERT, p. 108)

Plastering is the smooth or textured coating applied after brickwork. The figure shows the first base coat being spread — it is left to set, then a second coat completes the finish. Use 1:6 cement-to-sand for external walls and 1:4 for internal walls, and keep the mix thick enough not to slide off.
Figure 6.21 — Applying the first coat of paint on the ramp (NCERT, p. 110)

Finishing protects the work. The ramp gets cement paint because it is water-resistant and prevents slipperiness: clean the surface, wet it slightly, apply the first coat in one direction, let it dry 24 hours while lightly sprinkling water, then apply the second coat.
Definitions from the Construction Chapter
These are the terms the chapter uses, in words you can reuse in your portfolio or assessment answers.
| Term | Plain definition | Textbook page |
|---|---|---|
| Construction | The process of building structures that people use in daily life | 92 |
| Foundation | The base of a building that increases its life, avoids cracks and guards against natural calamities | 93 |
| Beam | The horizontal element that carries the load of the slab or roof | 93 |
| Column | The vertical element that supports beams and transfers the building’s weight to the foundation | 93 |
| Roof | The upper element, built with rafters or trusses, that protects from weather and completes the enclosure | 93 |
| Process chart | A table listing key construction tasks, their estimated dates and who is responsible | 95 |
| Mortar | A mixture of sand, water and cement (and often lime) that binds materials; more flexible than concrete | 99 |
| Concrete | A mixture of sand, water, cement and gravel that hardens into a strong, durable, stone-like material | 100 |
| Bill of Materials (BoM) | A list of items with quantities and estimated costs that helps estimate costs in advance and avoid waste | 101 |
| Curing | Keeping new mortar or concrete wet for 14–28 days so the chemical bonding reaction completes | 104 |
| Plastering | Applying a smooth or textured coating to a wall for durability, protection from moisture and heat, and looks | 108 |
| Plumb bob | A tool that hangs a weight on a string to check whether a wall or pillar is perfectly vertical | 100 |
| Spirit level | A tool with a bubble in a glass tube to check whether a surface is perfectly horizontal or vertical | 100 |
| Water level tube | A long transparent rubber tube filled with water, used to check that two distant points are at the same height | 100 |
| Stretcher bond | Bond in which the length of the brick faces the front; used for half-brick walls and short spans | 105 |
| Header bond | Bond in which the width of the brick faces the front; used for thick and curved walls | 105 |
Common Mistakes Students Make in Construction Class 9
The chapter’s safety and quality warnings are exactly where students slip. Read each mistake before you make it, and apply the correction.
| Mistake | Correct rule | How to check your answer |
|---|---|---|
| Trusting your eyes instead of a plumb bob to check a wall | Always use a plumb bob to ensure the wall is perpendicular to the ground (NCERT, p. 107) | If a wall is even slightly out of plumb, gravity acts to weaken it over the years — hang the plumb bob and compare the string with the wall face (NCERT, p. 112, Q7) |
| Laying dry bricks | Soak bricks in water for 6–12 hours before laying (NCERT, p. 106) | Dry bricks absorb water from the mortar, leaving the bond weak — check that bricks are wet when placed |
| Stopping curing early | Keep mortar or concrete wet for 14–28 days; for minor repairs, let it set 24 hours first, then sprinkle water (NCERT, p. 104) | If curing stops early, the structure becomes weak and cracks appear — the wetting routine must match the full period |
| Leaving cement exposed to rain | Store cement in a dry place (NCERT, p. 99) | Damp cement loses strength and becomes unusable — keep it covered and off the floor |
| Using the wrong mortar ratio for the job | Brick masonry 1:3, RCC 1:2, general repair 1:3 to 1:6, external plaster 1:6, internal plaster 1:4 (NCERT, pp. 102, 108) | Match the ratio to the task before mixing; ask an expert when unsure |
| Forgetting the 10 per cent wastage allowance in brick estimates | Add 10 per cent to the calculated brick count for breakage and cutting (NCERT, p. 102) | Multiply your brick count by 1.10 and round up when ordering |
Construction Class 9: How the Assess Your Learning Questions Test You
The chapter ends with nine self-assessment questions (NCERT, p. 112). This is the chapter’s own check of what you can do — not a board paper, and no marks are promised anywhere on this page. Each question targets one practical skill.
| Question | Skill it tests |
|---|---|
| Q1 | Identifying basic structural elements (foundation, walls, roof, beams, columns) in a real structure and describing their functions |
| Q2 | Recognising load-bearing vs RCC construction and justifying why each was chosen |
| Q3 | Sequencing a process chart and explaining why the order of steps matters |
| Q4 | Naming safety rules and explaining how ignoring one can cause an accident |
| Q5 | Understanding material storage — what dampness does to cement and why |
| Q6 | Connecting construction to water conservation (construction bans in drought years) |
| Q7 | Explaining the technical risk of skipping the plumb bob and the long-term effect on building safety |
| Q8 | Reflecting honestly on your own work — what went well, what did not, what you would change |
| Q9 | Applying the chapter’s learnings to a real-life situation |
A full answer to Q7, for example, must state the risk (gravity weakens a wall that is not vertical) and the consequence over years (progressive weakening and possible structural failure). Textbook contents and the examinable syllabus are not always identical — check the current official syllabus for what is assessed.
Quick Recall: The Construction Sequence in One Page
This is the chapter’s own closing checklist (NCERT, p. 111), compressed for the night before a test.
- Learn through observation first — visit a construction site, search online, or interview experts before beginning any work.
- Prepare the ground — clean the site, remove grass and loose soil, and take expert guidance on foundation depth based on the weight of the structure and soil type.
- Check level and plumb with tools — water level tube for distant points at the same level, spirit level for surfaces level with the ground, plumb bob for perpendicular walls.
- Soak bricks for 6–12 hours before laying them.
- Use the correct proportions — sand, cement and water for mortar; sand, cement, gravel and water for concrete.
- Cure for 14–28 days — spray water on the construction without letting it dry out.
- Clean the site afterwards — remove debris, unused sand and cement.
- Paint the structure — it not only looks attractive but increases durability.
Related Resources
This listing is maintained for the 2026-27 academic session using the NCERT textbook information available to us. NCERT remains the authority for confirming the latest edition.
Continue with the same book and subject through these pages:
- NCERT Class 9 Skill Education (Kaushal Vikas) notes — the home page for this subject.
- Class 9 hub — notes across all subjects for this class.
- Chapter 5: Work with Machines and Materials — Section 6.4 asks you to refer to Chapter 5’s Section 5.4.3 for drawing the side view, plan and elevation.
- Chapter 7: Apparel — the chapter that follows Construction in the Kaushal Vikas book.
- All CBSE notes — browse every class and subject.
For the official source, visit the NCERT textbook portal where all Class 9 Kaushal Vikas chapter PDFs, including Chapter 6 Construction, are published.
Sources and Data Verification
This page describes Chapter 6 (Construction) of the NCERT Kaushal Vikas Grade 9 textbook, official edition on ncert.nic.in. It covers Chapter 6 only, not the whole book. The page is maintained for the current academic session using the NCERT information available to us. NCERT settles textbooks, editions and PDFs; CBSE settles curriculum, syllabus and examinations.
| What the chapter holds | Count | Where it is used |
|---|---|---|
| Printed pages | 22 | |
| Sections in the chapter | 23 | |
| Figures with NCERT captions | 41 | |
| Tables | 10 | |
| Worked examples | 4 | solved step by step in our NCERT Solutions |
| Official NCERT PDF | Download the chapter PDF | the chapter exactly as NCERT publishes it |





Reference: NCERT Class 9 Kaushal Vikas textbook, chapter 6, official edition on ncert.nic.in.
Construction Class 9: Frequently Asked Questions
What is the difference between mortar and concrete?
Mortar is a mixture of sand, water, cement and lime, used to bind materials together — it “glues” bricks, stones and tiles (NCERT, p. 99). Concrete is sand, water, cement and gravel or crushed stones, and it forms the structure itself — ramps, foundations, fences and roads (NCERT, p. 100).
Mortar is more flexible and allows slight movement without cracking; concrete hardens into a strong, durable, stone-like material. Concrete reinforced with steel (RCC) is what supports huge structures.
How do you estimate the number of bricks needed for a small structure?
Calculate the volume of the structure, then compare it with the space one brick occupies. By the rule of thumb, 1 m³ of construction needs about 500 bricks (NCERT, p. 102). For a structure of volume 0.72 m³, that is 360 bricks; add 10 per cent for wastage and buy about 400.
The chapter assumes a standard brick of 200 × 100 × 100 mm including the mortar joint, so check your actual brick size before ordering.
Why must bricks be soaked in water before laying them?
Dry bricks absorb water from the fresh mortar, which weakens the bond between brick and mortar. Soaking bricks in water for 6–12 hours before use stops them from pulling water out of the mortar (NCERT, p. 106).
What is curing and why must it continue for 14 to 28 days?
Curing is keeping newly applied mortar or concrete wet so the chemical reaction between water and the material completes. The bonding becomes stronger with curing, and the process takes up to 28 days (NCERT, p. 104). If curing stops too early, the structure becomes weak and cracks may appear.
For minor repairs, let the mortar set for 24 hours first, then sprinkle water lightly for the full period.
What is the difference between load bearing and RCC construction?
In load-bearing (wall-bearing) construction, the walls themselves carry the entire weight of the roof and upper parts and transfer it directly to the ground — it suits single-storey houses (NCERT, p. 96). In RCC construction, a skeleton of concrete and steel columns and beams carries the load to the ground, not the walls — it suits multi-storey and earthquake-resistant buildings (NCERT, p. 97).
What is the standard size of a brick used in India?
The standard size is 190 × 90 × 90 mm (NCERT, p. 101). For estimation, add 10 mm for the mortar applied between bricks and treat the brick as 200 × 100 × 100 mm. Bricks are typically manufactured to specifications set by the Bureau of Indian Standards (BIS).
Explore Class 9 Skill Education Books
- Previous: Work with Machines and Materials
- Next: Apparel
Related chapters:
- Work with Life Forms
- Rooftop Gardening
- Precision Farming