
This is the official NCERT Class 8 Kriti (Arts) textbook, Chapter 16 — Still Life in Colour, a nine-page practical chapter built around Activity 16.1, where you arrange everyday objects and draw them in a small group.
The chapter explains why objects became the main subject of art, then takes you step by step through choosing, arranging, observing, drawing and colouring your own still life.
The official NCERT PDF of still life in class 8 is right below, followed by a plain-English walkthrough of everything the chapter contains.
Download the Official NCERT Class 8 Kriti Chapter 16 Still Life in Colour PDF
The file below is the chapter itself — keep it open next to your drawing paper while you work through this page.
The official copy of the chapter is the NCERT Class 8 Kriti Chapter 16 Still Life in Colour PDF on ncert.nic.in — open it to see the full colour plates of the student arrangements, the technique swatches, and the two still life paintings the textbook reproduces.
Chapter 16 Still Life in Colour at a Glance
This is what the official PDF holds, before you open it. The quick-facts table below shows the chapter’s length, its sections and its figures, as the NCERT file lists them.
In content terms, this is one practical activity — Activity 16.1: Arranging a Still Life — supported by a materials list, a note to the teacher, four colour techniques, two artist profiles and a closing learning-outcomes table.
What This Chapter Covers: From Symbol to Main Subject
This is the historical idea that makes the activity meaningful. Understand it first, because the whole chapter is built on one big change in art.
From cave paintings to temple sculptures, objects appeared in Indian art but were never the main subject. They carried symbolic meaning — the Dharma Chakra (wheel of law), weapons and musical instruments were held by deities and courtiers inside larger compositions.
Two examples the chapter names are the wheel in a stone carving at Sanchi Stupa and the swing in a Kangra painting.
Around the 16th century, that changed. Artists began arranging natural and human-made objects and making them the main subject of the artwork. The objects stayed still, but the skill lay in making them look three-dimensional and almost alive — which is why the form is called still life.
Still life did not stop at painting. The chapter points out that artists now make still life compositions as photographs and sculptures, and product advertisements use them in magazines, hoardings, newspapers and television.
| Before the 16th century | From the 16th century onward |
|---|---|
| Objects were an integral part of a larger composition | Objects themselves are the main subject |
| Objects carried symbolic meaning — the Dharma Chakra, weapons, instruments, the swing in a Kangra painting | Objects are arranged and studied for their own sake |
| The skill lay in the larger scene | The skill lies in making objects look three-dimensional and almost alive |
Key Concepts in the Still Life Chapter
These are the observation words Activity 16.1 expects you to use while you look, arrange and draw. Each one names something specific to notice.
- Still life — an artwork in which arranged objects that remain still are the main subject, made to look three-dimensional and almost alive.
- Composition — the arrangement of objects as one unit, leading the eye to explore every object.
- Contour — the outline and lines that define each object’s shape.
- Proportion — the size of each object compared with the others.
- Negative space — the empty shapes between objects.
- Backdrop — the single-coloured cloth or plain material placed behind objects so they stay in focus.
- Overlapping — placing objects so they partly cover one another and read as one composition.
- Tonalities — the gradations of light and dark created when light falls on objects from one side.
- Shadow — the dark areas objects cast on the cloth and nearby surfaces.
Activity 16.1 Step by Step: From Objects to Finished Still Life
Activity 16.1 is the chapter’s teaching core. It asks you to work in small groups made by shared interest, and the note to the teacher says it needs two periods of 40 minutes each, ideally as a block. The five steps below follow the chapter’s own sequence.
Step 1: Choosing Objects and a Backdrop
Your objects are the subject of the drawing, so the choices here decide how much you enjoy the work. Remember that you will look at these objects very closely for a full period.
- Choose three to four objects from your everyday life and culture that convey your identity and belonging — you know their minutest details, so drawing them is easier.
- The chapter’s examples: a basket, clock, ball, toy, shoes, trophies, flowers and fruits.
- Search for rare or unusual objects made by local artists that complement the others.
- Make sure the objects vary in material, colour, texture, size and dimension.
For the backdrop, select one or two large pieces of single-coloured cloth. The colour should complement the objects, not distract from them; if cloth is unavailable, any plain material that keeps the objects in focus works.
The chapter adds a “Do You Know?” note here: the tradition of hand-painted clay objects is seen across India, and some artists make fruits and vegetables in various sizes that almost look real — exactly the unusual local pieces worth hunting for.
Step 2: Arranging the Objects: Overlap, Light and Shadow
Arrangement is what separates a still life from a pile of objects. The chapter gives four rules, and every one controls where your eye goes.
- Drape the cloth with a few folds that fall naturally.
- Overlap the objects a little, so that from different angles they appear to compose as one unit.
- Experiment with placements — an object can stand upright, lie on its side, lean on something, or be raised.
- Let light fall from one side. Light from a single side creates tonalities and shadows; partially close or open doors and windows, or use screens, old banners, curtains or sheets to filter the light.

The picture above accompanies the chapter’s note to the teacher: let students select objects and experiment with different arrangements on the first day. Treat the first session as trial and error — you are testing placements, not drawing yet.
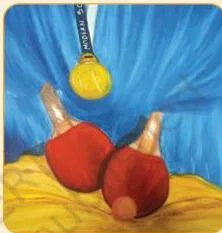
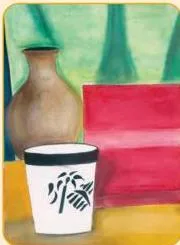
This artwork panel turns the light rule into an exercise: look at each drawing and identify the side from which light falls. If you can answer for these examples, you can check your own arrangement — your objects should throw shadows on the cloth and surfaces, lit from one clear side.
Step 3: Observing and Measuring Before You Draw
Observation is the skill this chapter is really teaching. The chapter sets aside five minutes of pure looking before pencil touches paper.
First decide whether your drawing fits better vertically or horizontally, and use the maximum space on your paper. Then run the observation checklist below.
- The size of each object and its proportion to the others.
- The lines and contours of every object.
- The various shapes combined to make each object.
- Symmetries and asymmetries in the forms.
- Overlapping parts hidden from your angle.
- The negative spaces — the shapes of empty distance between objects.
- The angle of light and the shadows on objects, cloth and surfaces.
This figure matters most for drawing. Instead of seeing a basket or bottle as one complicated thing, see it as simpler shapes fitted together. Once the basic shapes sit correctly inside your markings, the contour is only the line that joins them.
Step 4: Drawing the Contour in Light Lines
With observation done, the drawing method itself has a fixed order. The chapter’s sequence protects you from the two classic errors: objects escaping the frame, and proportions drifting.
- Mark the edge points — mark the parts of objects that would sit close to the edges of your paper, so everything stays inside the frame.
- Measure proportions with your pencil. Hold the pencil against the objects and compare the smallest object in relation to the tallest.
- Record ratios, not actual sizes. The chapter marks this as important: correct proportions come from ratios, not from copying real measurements.
- Draw the hidden basic shapes of each object inside the markings you made.
- Complete the contour and add details using light lines, so corrections stay easy.
The chapter’s technical tip: keep lifting your head up every few seconds to re-observe the still life. This improves observation and gives you a close resemblance to the objects.
Step 5: Colouring With Stippling, Hatching or Brush Strokes
For colouring you need A4 size paper or 1/4 chart paper, pencils, sharpeners, erasers and a colouring medium of your choice. The chapter demonstrates four techniques, each building tone differently.
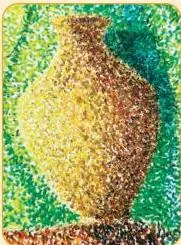
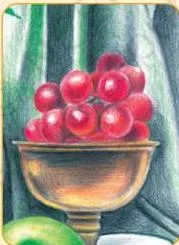
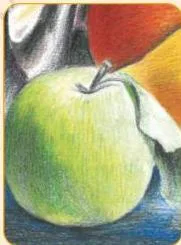
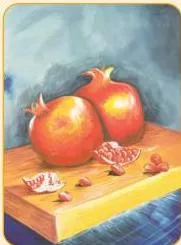
In stippling, tone and colour come from dots; the chapter tells you to experiment with the varying sizes and colours of dots, lines, strokes and patches. In hatching, tone comes from parallel lines, and the teacher note adds that markers or sketch pens can use cross-hatching — crossing lines in different colours — to reach tonalities, light and shade.
Brush strokes with poster colour let you control the width of each stroke and mix colours as you work. Whatever medium you choose, be innovative while mixing colours — the technique exists to show the tones and shades your arrangement actually has.
Figures in the Chapter, and What to Notice
The chapter teaches through its illustrations as much as its text. This section walks through the illustrations that carry the chapter’s ideas — the historical examples, the technique demonstrations and the two artists — and says what to look for in each.
Indian Art Before Still Life, and Still Life Beyond Painting
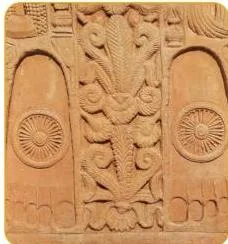
This opening figure makes the chapter’s argument visual: in Indian art, objects such as the wheel of law, weapons and the swing were integral to compositions but never the subject themselves. The wheel appears as a symbol in a stone carving at Sanchi Stupa, and the swing as a symbol in a Kangra painting — the chapter’s two Indian examples.
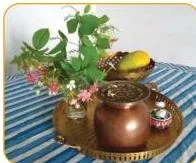
This figure backs the chapter’s claim that still life survived beyond the canvas. Artists create still life compositions as photographs and sculptures, and product advertisements use still life for magazines, hoardings, newspapers and television.
Colour and Shading Technique Examples From the Chapter
This note to the teacher is really advice you can use. If your medium is markers or sketch pens, don’t fill shapes flat — build them with cross-hatching and stippling in different colours, and the tonalities, light and shade appear by themselves.
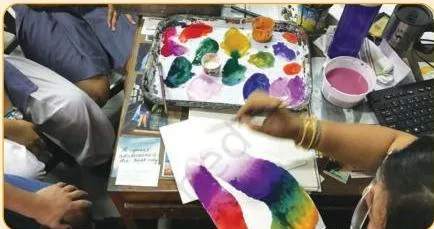
This is the chapter’s instruction in picture form — a medium of your choice, techniques tried out until they show the tones and shades of your arrangement. Vary the size and colour of dots, lines, strokes and patches, and mix colours innovatively.
Two Artists Known for Still Life: Cezanne and Ara
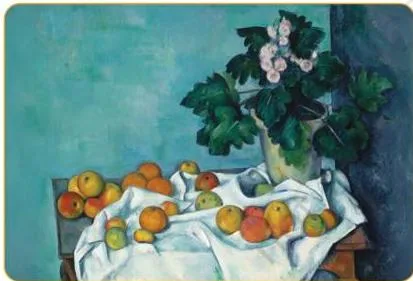
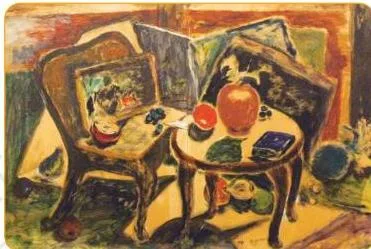
The chapter ends its look at still life with two very different painters.
Paul Cezanne was a French artist of the 19th century, known for experimenting with new techniques of painting that many did not accept during his time. His 1890 work, Still Life with Apples and a Pot of Primroses, shows his arrangement and brushwork.
Krishna Howlaji Ara was a well-known Indian artist of the 20th century and a member of the Progressive Artists Group in Mumbai, inspired by artists from all over the world and known for his still life paintings. The chapter asks you to observe both paintings and note the similarities and differences in arrangement, colours and brush strokes.
Still Life Terms, Explained Simply
These are the words the activity uses, in one compact lookup table. Use it while you work.
| Term | Plain meaning | Where it matters in the chapter |
|---|---|---|
| Still life | An artwork whose main subject is arranged objects that remain still, made to look three-dimensional and almost alive | The whole chapter; Activity 16.1 |
| Composition | The arrangement of objects as one unit | Step 2: arranging the objects |
| Contour | The outline and lines of an object | Steps 3 and 4: observing and drawing |
| Proportion | The size of each object compared with the others | Steps 3 and 4: measuring with the pencil |
| Negative space | The empty shapes between objects | Step 3: observation checklist |
| Backdrop | Plain single-coloured material behind the objects | Step 1: choosing the backdrop |
| Overlapping | Objects partly covering one another | Steps 2 and 3: arranging and observing |
| Tonalities | Gradations of light and dark on objects | Step 2: light and shadow; Step 5: colouring |
| Shadow | Dark areas cast by objects on the cloth and surfaces | Steps 2 and 3: lighting the arrangement |
Common Mistakes Students Make in a Still Life Drawing
These are the exact points the textbook warns about, stated as errors before you make them. Each row pairs the mistake with the rule that fixes it.
| Mistake | Correct rule | How to check your answer |
|---|---|---|
| Drawing objects at their actual size | Mark ratios and proportions, not actual sizes; measure the smallest object against the tallest with your pencil | Measure your drawn object ratios against pencil measurements of the arrangement |
| Choosing a backdrop that distracts | Use one or two large pieces of single-coloured cloth that complement the objects | Stand back — are the objects still the focus? |
| Placing objects with no overlap | Overlap objects a little so they compose as one unit | View from different angles: does it read as one group? |
| Lighting the arrangement evenly | Place objects so light falls from one side, creating tonalities and shadows | Do the shadows fall on objects, cloth and surfaces? |
| Starting to draw before marking edge points | Mark the points near the paper’s edges first | Is every object inside the frame? |
| Forgetting to look up while drawing | Lift your head every few seconds to re-observe the still life | Does the drawing resemble the arrangement? |
How This Chapter Is Assessed: Learning Outcomes
The chapter closes with a table that the teacher and the student both use. It names what the activity is meant to develop, with columns for teacher assessment and self assessment.
| CG | C | Learning outcome | Teacher | Self |
|---|---|---|---|---|
| 1 | 1.1 | Observes the variations in material, colour and position of objects when creating a still life | ||
| 3 | 3.2 | Takes informed decisions from choosing objects, arranging them and creating the still life | ||
| Overall Participation |
Notice the pattern: the first outcome is about observation — noticing variations in material, colour and position — and the second is about decisions — choosing objects, arranging them and creating the still life. The third row is overall participation.
The columns are left for the teacher’s judgement and your own self-assessment. The chapter gives no marks or weightage, and textbook contents and the examinable syllabus are not always identical — check the current official syllabus for how this is assessed at your school.
The Still Life Workflow: Six Steps to Remember
This is the whole activity compressed into one sequence. Rehearse it the night before the practical period.
- Choose objects and backdrop — three to four varied objects plus single-coloured cloth.
- Arrange — drape the cloth, overlap the objects, try placements, light from one side.
- Observe and measure — decide paper orientation, run the five-minute checklist.
- Mark the frame — mark the edge points so nothing escapes the paper.
- Draw the contour — measure ratios with the pencil, fit basic shapes, complete with light lines.
- Colour — pick a medium and use stippling, hatching or brush strokes to show tones and shades.
Related NCERT Class 8 Resources
This listing is maintained for the 2026-27 academic session using the NCERT textbook information available to us. NCERT remains the authority for confirming the latest edition.
If this chapter brought you here, these pages on this site get you to the rest of the book and the class.
- The NCERT Class 8 Kriti book page lists every chapter in the Arts textbook.
- The NCERT Class 8 Arts notes cover the visual arts chapters of the book.
- The People in Places chapter page covers another chapter in the same NCERT Class 8 Kriti book.
- The NCERT Class 8 books hub links every Class 8 subject.
- The CBSE notes index is the entry point to the whole site.
The official file for the chapter remains the NCERT Class 8 Kriti Chapter 16 Still Life in Colour PDF on ncert.nic.in, which this page has described throughout.
| What the chapter holds | Count | Where it is used |
|---|---|---|
| Printed pages | 9 | |
| Figures with NCERT captions | 14 | |
| Tables | 1 | |
| Official NCERT PDF | Download the chapter PDF | the chapter exactly as NCERT publishes it |
Reference: NCERT Class 8 Kriti textbook, chapter 16, official edition on ncert.nic.in.
Sources and Data Verification
Plain facts about where this page’s information comes from.
- The chapter facts above describe the NCERT Class 8 Kriti (Arts) textbook, English medium, Chapter 16 — Still Life in Colour, official edition on ncert.nic.in.
- This page covers this chapter only, not the full CBSE scheme of subjects.
- The page is maintained for the current academic session using the NCERT information available to us.
- NCERT settles textbook editions and official PDFs; CBSE settles the curriculum, syllabus and examinations.
Frequently Asked Questions About Still Life in Class 8
What is a still life in class 8 Kriti Chapter 16?
In this chapter, a still life is an artwork in which arranged objects that remain still are the main subject. The painter’s skill is judged by how three-dimensional and almost alive those objects look.
What materials do I need for Activity 16.1?
The chapter’s materials list is A4 size paper or 1/4 chart paper, pencils, sharpeners, erasers and a colouring medium of your choice. The technique examples use sketch pens, oil pastels, colour pencils and poster colour.
Which artists are known for still life in this chapter?
Two: Paul Cezanne, a French artist of the 19th century, and Krishna Howlaji Ara, an Indian artist of the 20th century and a member of the Progressive Artists Group in Mumbai.
What is the difference between stippling and hatching?
Stippling builds tone with dots; hatching builds tone with parallel lines. With markers or sketch pens you can also use cross-hatching — lines crossing each other in different colours — to achieve tonalities, light and shade.
How do I keep the objects in correct proportion?
Use your pencil as a measuring tool: measure the smallest object in relation to the tallest, mark the ratios on your paper, and remember that ratios matter more than actual size. Mark the edge points first so everything stays within the frame.
Can a still life be made outside drawing and painting?
Yes. Artists create still life compositions as photographs and sculptures too, and product advertisements use still life in magazines, hoardings, newspapers and television.
Explore Class 8 Arts Books
Related chapters: