
People in Places Class 8 is Chapter 17 of the NCERT arts textbook Kriti — a 12-page chapter that teaches you to draw believable human figures inside a place that looks deep and real. The official People in Places Class 8 PDF is right below, and this page explains the whole chapter in plain language for the current academic session.
People in Places Class 8 PDF: official NCERT chapter download
The official chapter file is free on the NCERT portal. Open the People in Places Class 8 PDF to read Chapter 17 exactly as it appears in the English edition of Kriti; the walkthrough below follows the chapter section by section, so keep the PDF open beside this page.
Inside the People in Places chapter: what the file holds
The table above shows the chapter’s size at a glance — its sections, figures and activity-based content. Here is the chapter’s structure at a glance:
- An introduction to perspective with the Observe steps — eye level, vanishing point and converging lines — plus photographs of a stepwell and building interiors.
- Activity 17.1: Make a Viewing Grid — materials and a step-by-step procedure with photo guidance.
- The Human Anatomy section — body ratios measured against the head, and the Indian Tālamāna Paddhati tradition from the Shilpa Shastra.
- Activity 17.2: Mark the Proportions and Activity 17.3: Draw Your Friends, with the Body Positions and Postures notes.
- Activity 17.4: Composition in Perspective — five steps from preparatory sketches to a title.
- A closing page: the Chapter 17 learning-outcomes checklist with Teacher and Self columns.
How the chapter is built: perspective, proportions, then a composition
This is an activity-based chapter, so the order of the activities matters. The book teaches two visual skills and then asks you to combine them in one artwork.
First comes perspective — making a flat drawing look three-dimensional. Next comes human proportion — measuring bodies in ratios and head units. Finally, Activity 17.4 puts both together in a composition of people in a place.
| Stage | What it asks of you | Chapter content |
|---|---|---|
| Observe | Study real scenes and name what you see — the eye level, the vanishing point and the angles of converging lines. | Perspective introduction and Activity 17.1 (viewing grid) |
| Measure | Learn the structure of the body and measure figures in head units and tālas. | Human Anatomy, Activities 17.2 and 17.3 |
| Compose | Plan and finish an artwork of people in an indoor or outdoor setting. | Activity 17.4 |
Perspective: how a flat drawing shows depth
Perspective is the chapter’s first big idea, and every later activity builds on it. It is the technique that makes a flat sheet of paper look deep.
Perspective is the technique of showing three-dimensional space on a two-dimensional surface. It creates an illusion of distance and depth: things that are closer appear bigger and more detailed than things farther away.
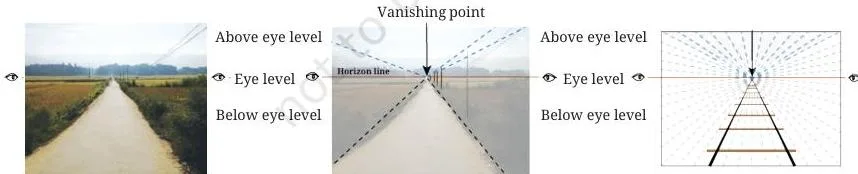
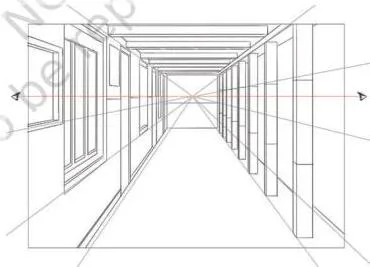
The photograph above is the chapter’s opening demonstration. The edges of the road are physically parallel, yet they appear to converge in the distance. That meeting point is the vanishing point, and it sits at the viewer’s eye level — you would see the same effect on railway tracks.
Horizon line, vanishing point and converging lines: the three tools
Before you draw anything in perspective, you need to find three things in the scene. The chapter’s Observe section lists them in order:
- Horizon line — the horizontal line that aligns with the viewer’s eye level.
- Vanishing point — the point, also at eye level, where parallel lines appear to converge.
- Angle of the converging lines — how steeply lines slant toward the vanishing point.
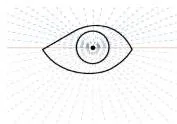
To picture this, the book offers a mental model: imagine your eyeball as a circle, with the vanishing point at its centre. The horizon line is the horizontal line across the middle of the eye, and other lines of the scene radiate from the centre like spokes.
The stepwell photograph shows the same idea on a monument — and the chapter points to the image printed on the 100 rupee note. The lines of the upper and lower storeys of the stepwell appear to converge at the vanishing point, exactly as the road edges did.
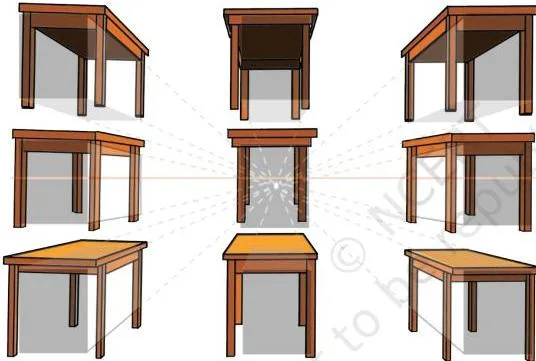
Once you understand these principles, the chapter promises, drawing simple objects from different angles becomes easy.
Making and using a viewing grid (Activity 17.1)
Finding the horizon and vanishing point by eye is hard at first. The viewing grid is a simple tool that compares angles for you while you learn.
Materials: a used or discarded transparent sheet, a measuring scale, a ball point pen or permanent marker, and scissors.
Procedure:
- Cut the transparent sheet to A4 size.
- Mark a grid of squares on it with the scale and pen or marker. This is your viewing grid.
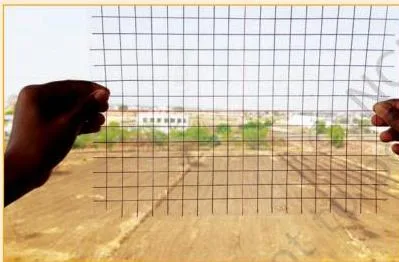
- Look at your surroundings through the grid. Hold it straight and still the whole time.
- Align the horizon line on the grid with your eye level.
- Find the lines that align with the grid’s horizon, and observe how the shapes of objects sit in relation to the grid squares.
- Compare the angles of lines in near objects with those in far objects.
- Choose a scene, then replicate what you see through the sheet onto your drawing paper.
The first photo shows the key step — the grid held so its horizon line sits on your eye level. A tilt, even a small one, changes every angle you are trying to copy.
The second photo shows the comparison step. Lines in near objects slant at clearly different angles from lines in far objects, and the grid squares give you a fixed reference to judge both against.
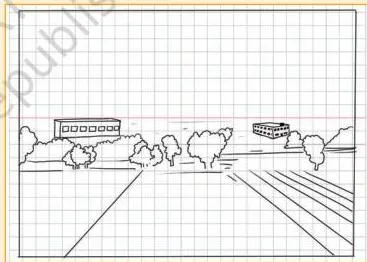
The third photo makes the chapter’s point: you can use the same viewing grid for different scenes. With more practice, you will be able to draw without a viewing grid at all.
Human anatomy: measuring the body in ratios and head units
Once you can draw a place convincingly, the chapter turns to the figures inside it. Artists measure bodies so their figures look believable.
Anatomy is the structure of the human body. Look at your old photographs, the chapter says, and notice how your body structure has changed from babyhood to now — some parts grow more than others.
These changes can be measured. The relationship between body parts is expressed as a ratio against one part taken as a unit, usually the head: parts the same size as the head give \(1:1\), parts twice the head give \(1:2\), and parts three times the head give \(1:3\).
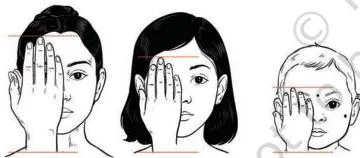
The diagram above shows this idea: each part of the body is compared with the head, and the comparison is written as a ratio.
The habit of measuring bodies is not new. The chapter introduces the Shilpa Shastra, texts that mention different ratios for divine beings, royalty, warriors, children, animals and mythological beings.
Their system is the Tālamāna Paddhati, and its unit is the tāla: one tāla equals the length of an adult hand measured from the bottom of the wrist to the tip of the middle finger.
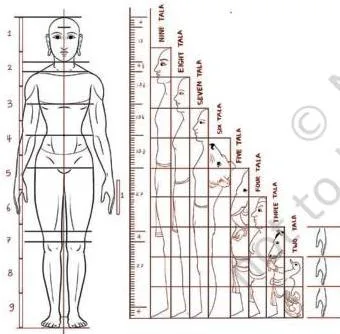
The illustration above belongs to that measuring tradition. The book’s note to the teacher suggests connecting this section with the mathematics class — ratio and proportion are the same idea in both subjects.
Mark the proportions: a worked example for Activity 17.2
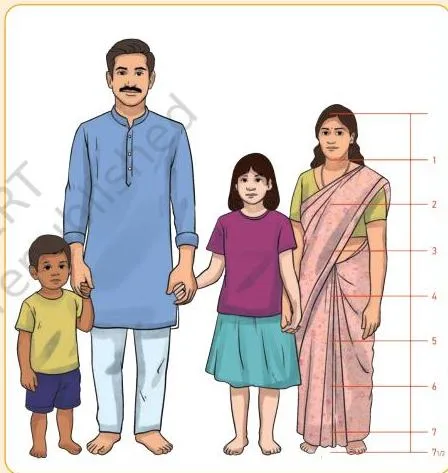
Activity 17.2 turns measuring into a written record. You work out how many heads tall the people in a picture are.
The chapter’s method has four steps:
- Mark the size of the head with two horizontal lines.
- Measure the distance between the two lines, and use that same spacing to mark more horizontal lines down the body.
- Count how many times the head repeats in the figure.
- Write the ratio of the height in relation to the head.
Here is the same method on a fresh example. Suppose a figure’s head measures 3 cm on your scale and the full height measures 21 cm.
- Step 1: Mark the head with two horizontal lines and measure the gap: \(3\ \text{cm}\).
- Step 2: Measure the full height of the figure: \(21\ \text{cm}\).
- Step 3: Find how many times the head repeats: \(21 \div 3 = 7\).
\[ \text{Height-to-head ratio} = \frac{21\ \text{cm}}{3\ \text{cm}} = 7 : 1 \]
Final answer: the figure is 7 heads tall, written as the ratio \(7:1\).
The picture below shows this marking done on people of different age groups. The discussion the book asks for is the point of the activity: discover how body proportions differ across age groups and body types.

Drawing your friends and their postures (Activity 17.3)
Activity 17.3 makes the measuring personal. Instead of a photograph, you draw the real people around you.
The chapter makes one point before you begin: every person’s proportions vary in small ways, and there are no stereotypical proportions that everyone fits into. That is why you measure each subject fresh instead of reusing one ratio.
Use your pencil as the measuring tool, the way you did for still life objects:
- Start with the head. Measure its size with the pencil and note how many times it repeats in the body.
- Based on those measurements, make rough markings so the whole body fits comfortably on your paper.
- Keep measuring and verifying the proportions as you draw each part.
- Complete the drawing and take feedback from your teacher on what looks proportionate and where you can improve.
Practise the standing figure first. After one or two standing drawings, observe the body in other positions — sitting, bending, lying, squatting — and ask friends or family to pose for you.
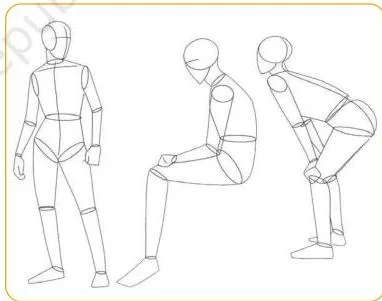
The picture beside the activity pairs with its closing advice: show your drawings to the people who posed and tell them the fascinating things you have learnt about body proportions.
Composition in perspective: the five-step final artwork (Activity 17.4)
This is the chapter’s final challenge — a finished artwork that uses both skills at once. The five steps take you from planning to a titled, coloured composition.
Step 1 — Preparatory sketches. Use your earlier drawings to plan the foreground, middleground and background elements. Mark the horizon line and the vanishing point. Begin with three human figures at varying distances — one near, one far — then add furniture, objects, trees, roads, vehicles or buildings.
The book adds one check here: the human figures should be proportionate to the landscape or indoor setting they are placed in.
Step 2 — Choose a layout. Show your sketches to your teacher, take their suggestions, and discuss your choice for the final artwork.
Step 3 — Begin the final artwork. Start with a line drawing using your sketches as reference, and make small edits or additions as you draw.
Step 4 — Colouring. Choose any medium — colour pencils, pastels, crayons, watercolours, poster colours, acrylic colours or natural colours. Pick a colour theme based on the season, the time of day or the mood, and try combinations on your preparatory sketches first.
Step 5 — Title your artwork. Jot down your ideas, inspirations, memories and personal connections, then write a short phrase from those thoughts as the title.
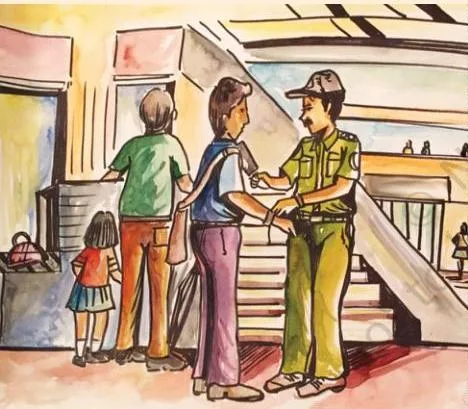
The picture that opens the activity is your target in image form: a composition showing people in an indoor or outdoor setting, with depth and proportions working together.
Reading the chapter’s images: how to find the eye level in each figure
The whole chapter trains one looking skill: find the eye level first, then the vanishing point, then the lines that converge there. The chapter prints its photographs with labels to show you how.
The photograph of Rani ki Vav — the stepwell at Patan, Gujarat — carries three labels: Above eye level, Eye level and Below eye level. Start with the middle label. The horizontal lines near it are your eye level. Now trace the lines of the storeys above and below: they slant toward a single point on that eye level — the vanishing point.
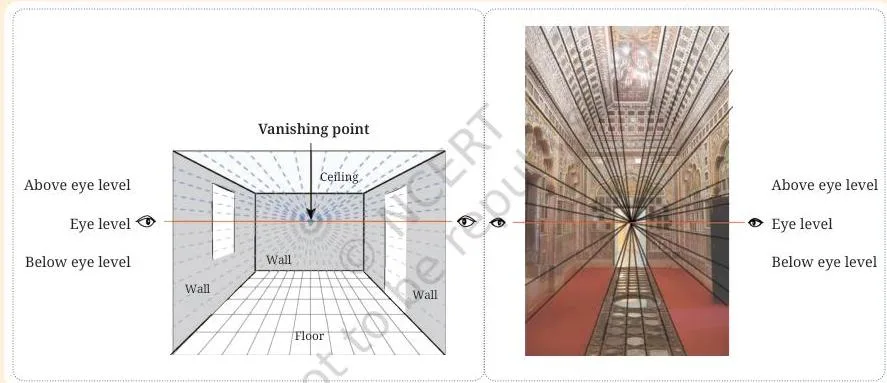
The building-interior photograph applies the same steps indoors: the ceiling and floor lines converge at the vanishing point, which sits on the eye level. The caption makes the payoff clear — once you understand the principles of perspective, drawing simple objects from different angles feels easy.
Key terms used in this chapter
A quick glossary to decode the chapter’s vocabulary. Each meaning is how the chapter uses the term.
| Term | Meaning in this chapter |
|---|---|
| Perspective | Showing three-dimensional space on a two-dimensional surface; creates an illusion of distance and depth. |
| Horizon line | The horizontal line that aligns with the viewer’s eye level. |
| Vanishing point | The point, also at eye level, where parallel lines appear to converge. |
| Eye level | The height of the viewer’s eyes; the horizon line sits at it. |
| Viewing grid | A transparent sheet marked with squares, held between your eye and the scene to compare angles and shapes. |
| Anatomy | The structure of the human body. |
| Proportion | The size relationship between body parts, written as a ratio against one part taken as a unit. |
| Tāla | The unit of the Tālamāna Paddhati: the length of an adult hand from the bottom of the wrist to the tip of the middle finger. |
| Tālamāna Paddhati | The Indian system of measuring body ratios and proportions, found in Shilpa Shastra texts. |
| Shilpa Shastra | Texts that give different ratios and proportions for depicting divine beings, royalty, warriors, children, animals and mythological beings. |
| Foreground, middleground, background | The three depth zones of a composition, from nearest to farthest. |
| Composition | An arrangement of human figures and other elements in an artwork. |
Common mistakes in perspective and proportion drawings
These errors come straight from the chapter’s own instructions. Catch them before they reach your paper.
| Mistake | Correct rule | How to check your answer |
|---|---|---|
| Tilting or moving the viewing grid while observing | Hold the grid straight and still, with its horizon line aligned to your eye level. | Before each look, re-check the grid’s position — if it moved, every copied angle moves with it. |
| Putting the horizon line anywhere in the drawing | The horizon line always aligns with the viewer’s eye level. | Ask: does my horizon sit at the eye level I actually drew from? |
| Forgetting the vanishing point or placing it off the eye level | Parallel lines converge at a vanishing point that is also at eye level. | Trace the converging lines backwards — they should meet at one point on the horizon. |
| Drawing every figure the same size no matter the distance | Nearer objects appear bigger and more detailed; distant ones appear smaller. | Compare your near and far figures: their sizes should differ, like the three figures in Activity 17.4. |
| Forcing every person into the same head-to-height ratio | There are no stereotypical proportions; each person varies. | Measure each subject separately with your pencil instead of reusing one ratio. |
| Making figures out of proportion with their setting | Human figures should be proportionate to the landscape or indoor setting. | Step back and compare a figure’s height with the furniture, tree or building beside it. |
How this chapter is assessed: activities and learning outcomes
This chapter has no end-of-chapter written exercise questions — the work is activity-based. The final page is a learning-outcomes checklist with Teacher and Self columns, and that checklist is the chapter’s own way of checking progress.
| Learning outcome (final page) | What it asks of you | The activity that builds it |
|---|---|---|
| Observes and depicts the ratios and proportions of the human body | Measure each figure and write its height-to-head ratio. | Activity 17.2 |
| Applies the proportions while drawing human figures in different postures | Draw standing figures, then sitting, bending, lying and squatting poses. | Activity 17.3 |
| Connect the concept of perspective drawing with real-life observations | Find the eye level and vanishing point in real scenes and photographs. | Activity 17.1 and the Observe steps |
| Applies perspective and proportion while making compositions about their everyday experiences | Plan and finish an artwork of people in a place. | Activity 17.4 |
Work through the four activities, then return to the checklist and mark the Self column honestly — can you do all four? The list also leaves a row for Overall Participation.
One reminder: textbook contents and the examinable syllabus are not always identical — check the current official CBSE syllabus for what is assessable.
The People in Places chapter in one screen
Ten points for a quick revision pass, in the order the chapter teaches them.
- Perspective shows three-dimensional space on a flat surface: nearer objects appear bigger and more detailed.
- The three tools: horizon line at eye level, vanishing point also at eye level, and the angles of converging lines.
- Visualisation trick: the eyeball is a circle, vanishing point at the centre, horizon line across the middle.
- The viewing grid (Activity 17.1) trains your eye — hold it straight and still, align the horizon with eye level, replicate the scene. With practice you can draw without it.
- Anatomy is the structure of the body; proportions are ratios between parts, measured against the head (\(1:1\), \(1:2\), \(1:3\)).
- Indian tradition: the Tālamāna Paddhati from the Shilpa Shastra; one tāla equals the hand length from wrist to the tip of the middle finger.
- There are no stereotypical proportions — measure each person separately.
- Draw postures in order: standing first, then sitting, bending, lying, squatting.
- The final composition runs five steps: preparatory sketches → choose a layout → line drawing with small edits → colour with a theme → give a title.
- Keep human figures proportionate to their setting.
Related resources and official source
This listing is maintained for the 2026-27 academic session using the NCERT textbook information available to us. NCERT remains the authority for confirming the latest edition.
If you are reading the Kriti book in order, the earlier chapter on still life is where you first used the pencil as a measuring tool — Activity 17.3 builds on that skill. The next chapter, Arts of the People – With the People – For the People, moves from individual drawings to art made with and for communities.
For the whole book, browse the NCERT Class 8 Kriti (Arts) book page for chapter-wise links, or start from the Class 8 hub to reach every subject. The NCERT books index covers all classes.
The official source for this chapter is the NCERT textbook portal, which hosts the complete Kriti textbook as a free PDF in its English edition.
| What the chapter holds | Count | Where it is used |
|---|---|---|
| Printed pages | 12 | |
| Figures with NCERT captions | 14 | |
| Tables | 1 | |
| Official NCERT PDF | Download the chapter PDF | the chapter exactly as NCERT publishes it |
Reference: NCERT Class 8 Arts textbook, chapter 17, official edition on ncert.nic.in.
Sources and data verification
- The chapter contents, activities and learning outcomes described on this page come from NCERT’s Kriti textbook for Class 8 Arts, Chapter 17 (People in Places), official edition on ncert.nic.in.
- This page covers that single chapter — not the other chapters of Kriti, and not other Class 8 subjects.
- It is maintained for the current academic session using the NCERT information available to us. NCERT settles textbooks, editions and PDFs; CBSE settles the curriculum, syllabus and examinations.
- For an NCERT book or edition, NCERT is the authority to confirm against; for what the examination will ask, check the current official CBSE syllabus.
Frequently asked questions
What is perspective in drawing?
Perspective is the technique of showing three-dimensional space on a two-dimensional surface. It creates the illusion of distance and depth: things that are closer appear bigger and more detailed, while things farther away appear smaller and less detailed.
Why do parallel lines like road edges appear to meet?
They are parallel, but they appear to converge at a vanishing point in the distance, which sits at the viewer’s eye level. The chapter’s example is the lines on either side of a road — you would see the same on railway tracks.
What is the Talamana Paddhati and how is one tala measured?
The Tālamāna Paddhati is the Indian system of measuring the ratios and proportions of the human body, described in Shilpa Shastra texts. One tāla is the length of an adult hand measured from the bottom of the wrist to the tip of the middle finger.
How do you measure body proportions with a pencil?
Use your pencil as a measuring tool: measure the size of the head and note how many times it repeats down the body. Make rough markings so the figure fits on your paper, and keep measuring and verifying as you draw each part — this is Activity 17.3’s method.
How many heads tall should a human figure be?
There is no single correct answer. The chapter says there are no stereotypical proportions that everyone fits into — body proportions vary with age group and body type — so you measure each person separately and write their own ratio.
Does the People in Places chapter have end-of-chapter questions?
No. The chapter is activity-based: four activities (17.1 to 17.4) plus posture practice, and it ends with a learning-outcomes checklist with Teacher and Self columns rather than written exercise questions.
Explore Class 8 Arts Books
Related chapters: