
This is Chapter 3 of the NCERT Kaushal Bodh (Vocational Education) book for Class 6, the Maker Skills project chapter, printed across pages 54–80. It teaches simple machines by building toys from waste material, then finding those same machines inside a bicycle and keeping the bicycle working. The official Work with Machines and Materials Class 6 Chapter 3 PDF is linked right below.
Work with Machines and Materials Class 6 Chapter 3 PDF — the official chapter file from NCERT’s website. Open it to see the full activities, the build figures and the three tables (Tables 3.1, 3.2 and 3.3) that the project asks you to fill in.
Chapter at a Glance: The Maker Skills Project
Use the chapter table on this page to see how much the file holds — its sections, figures and tables. What follows is what the project actually asks of you.
Two halves, one project. First you make toys from waste material using simple machines. Then you find the same simple machines inside a bicycle and learn to maintain them.
The book is clear on one rule up front: it offers example projects, and you take up one — either choose one of these or design your own with your teacher’s help (p. 55).
| Activity | What you build or do | Simple machine involved | NCERT page |
|---|---|---|---|
| Activity 1 | Identify simple machines around you and record them | All of them | p. 61 (Table 3.1) |
| Activity 2 | Catapult and robotic arm | Lever | p. 62 |
| Activity 3 | Propeller boat | Propeller | p. 65 |
| Activity 4 | Rubber band car and air balloon car | Wheel and axle | p. 67 |
| Activity 5 | Windmill | More than one simple machine | p. 70 |
| Activity 6 | Find simple machines in a bicycle | Multiple | p. 72–73 |
| Activity 7 | Visit to a bicycle repair shop | — | p. 76 |
| Activity 8 | Organise an exhibition of the toys | — | p. 77 |
What the Chapter Asks You to Do
The project brief is simple: learn simple machines by building toys from waste, then apply that knowledge to a real complex machine — the bicycle. Everything a complex machine does, it does because simple machines inside it work together.
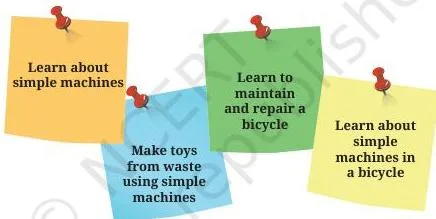
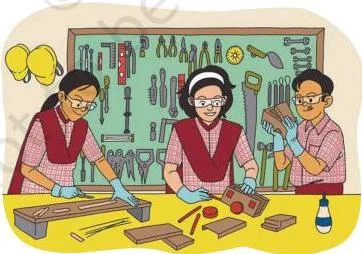
Figure 3.1 shows the end result of the whole project: toys made from trash, built with tools. The picture is your target — every activity after this leads towards making something like these.
By the end of the project, the book says you will be able to do four things (p. 59):
- make toys from various materials using simple machines — catapult, robotic arm, propeller boat, balloon car, rubber band car and windmill;
- identify the simple machines that make up a complex machine like a bicycle;
- identify the main parts of a bicycle and their functions;
- find common bicycle problems — flat tyres, misaligned brakes — and do the necessary maintenance and repair.
Safety rules before you start (p. 60)
- Be careful with cutting tools and sharp edges.
- Clean the area after each activity and store materials and tools as your teacher instructs.
- While using the toys, make sure you do not hurt yourself or others.
Materials and tools (p. 60)
For making toys from trash: cardboard, plastic pipe, empty plastic bottles, plastic spoon, drinking straws, plastic bottle caps, paper, ice cream sticks, thread, rubber bands, glue, tape, glue gun, cellophane tape, clothes clips, all pin, balloon, colour box and chopsticks (wood, plastic or metal). Tools: scissors, metre scale and cutter.
For the bicycle half: you need at least 5–6 bicycles, oil or grease, and tools — spanner set, wrenches, chain brush, tyre levers and an air pump. You will also visit a bicycle shop, or ask someone who repairs bicycles to come to the school (p. 60).
Learning steps online (p. 62)
Search for build steps using the keywords “DIY + (name of toy)” — DIY means Do It Yourself. Add the word “video” to see videos. And the book’s internet safety rule: ask your teacher for help, do not upload or download anything, and do not share personal information.
Key Idea: Simple Machines Make Work Easier
One idea supports the entire project, so it comes before any making begins: simple machines help us do things beyond our own capacity. We cannot lift heavy loads or break wood with bare hands, but a cart with wheels moves heavy objects with less force, and pulleys lift heavy loads (p. 58).
The chapter’s ground rule is this: complex machines around us — bicycles, toys, buses, cycle rickshaws, autorickshaws, even doorknobs — are made of interconnected simple machines (p. 58). A big bus is many small machines working together, and the same simple machines appear in bicycles, toys, doors and windows.
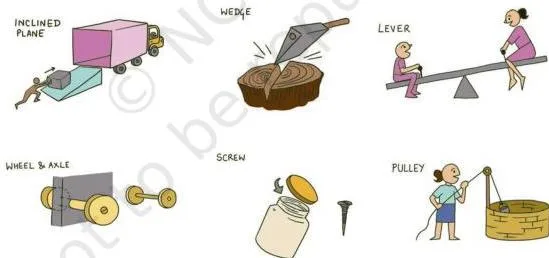
Before you build anything, Activity 1 sends you on a hunt: identify everything around you that helps you do something, and work out whether it is a simple machine or is made of simple machines. Figure 3.2 works as your checklist.
Record what you find in Table 3.1 (p. 61) — the book starts the table with a knife (cutting vegetables and fruits) and a vegetable peeler, and leaves the rest of the rows for you.
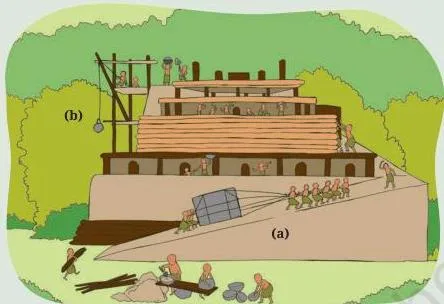
Simple machines are not modern inventions. Figure 3.3 shows how ancient people used an inclined plane and a pulley to move heavy loads (p. 59).

The temple picture makes the same point bigger: workers moved and placed massive stone blocks using inclined planes, levers and pulleys — the same simple machines we still use today (p. 59). That is why the chapter teaches you this history: you are about to use the same ideas with ice cream sticks and bottle caps.
Here is the learning order the chapter sets up (p. 58): understand the simple machine, build a toy with it, then find it again inside a bicycle.
Reading the Figures: From Waste Toys to the Bicycle

Each activity pairs a simple machine with a toy, and the figures in your book are step-by-step build instructions. Below, each build figure is read for you — what it shows, which machine it demonstrates, the materials it needs, and the step students most often get wrong.
Catapult and Robotic Arm: Levers in Action
A lever is a fixed bar or handle that moves around a fixed point called the hinge or fulcrum (p. 62). Opening a tin lid with a spoon is a lever — the spoon tip goes under the lid and you push the other end. A seesaw is another example.
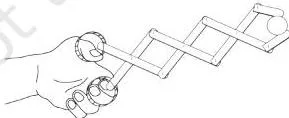
The catapult uses one lever; the robotic arm uses multiple levers (p. 62).
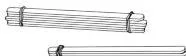
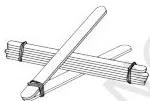
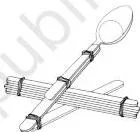
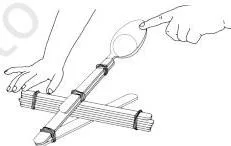
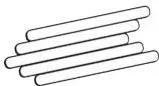
In Figure 3.4 the picture strip shows three moves (p. 63): first stack 5–6 ice cream sticks and bind them with rubber bands at each end; second, place that stack together with two sticks joined at one end, as the figure shows; third, attach the ice cream spoon with a rubber band.
The spoon is the arm that throws, the rubber band acts as the hinge, and the whole toy is a single lever. The step students miss: the two loose sticks must be bound at one end only, or the spoon has nothing to bend against.
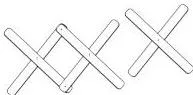
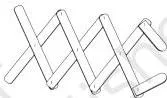
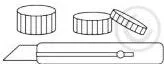
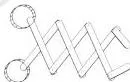
Figure 3.5 shows the robotic arm (p. 64): pierce sticks in the centre, push a small piece of toothpick through the holes to join them, add a few more sticks the same way so the joints move freely, cut the centres out of bottle caps with a cutter, and glue the caps to the ends of the first set of sticks.
The most important step is in Step 1’s last line: add glue where the sticks are joined — skipped glue is why the arm falls apart. The bottle caps become the “hands” at the end of the arm.
Propeller Boat, Rubber Band Car and Air Balloon Car
These three toys introduce two more simple machines: the propeller and the wheel and axle.
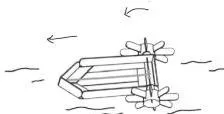
A propeller is a wheel with blades; as the wheel moves, the blades push through water or air and move the object forward (p. 65).
In Figure 3.6 the strip builds the boat in six moves (p. 66): paste ice cream sticks into a boat shape with holes marked by dots; make the propeller by slitting bottle caps and pasting sticks to their sides; pass a straw through the caps and the boat’s side holes; tie a rubber band from the boat’s tip to the middle of the straw; then wind the rubber band using the paddle wheels and set the boat in water.
The rubber band stores the twist that spins the paddle wheels. The common mistake: winding the rubber band the wrong way so the boat moves backwards — watch which way the blades face in the figure.
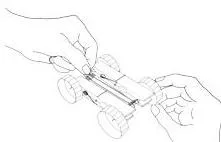
Figure 3.7 builds the rubber band car (p. 68). The key instruction is Step 2: make holes in the exact centres of four bottle caps and attach them to a toothpick or wooden skewer piece as wheels. Exact centres are what keep the car running straight.
The strip finishes with a toothpick piece glued between one set of wheels (the front), a rubber band looped around the straw at the back, and the band wound up before release on stable ground.
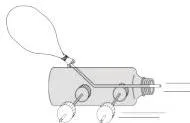
Figure 3.8 shows the air balloon car (p. 69): tape chopsticks onto the bottle, fix bottle-cap wheels to them, tie the balloon to one end of a straw, and push the other end of the straw through a hole in the bottle.
The book gives two working models: blow the balloon and hold the straw shut with a finger, place the car on an even surface, then release — escaping air pushes the car forward. The common mistake is blowing the balloon too weakly; the car needs a good fill to move.
Windmill: Combining More Than One Simple Machine
This is the first toy that needs two simple machines working together, and the chapter says so directly: a real windmill has many parts, but the working model combines a propeller with a wheel and axle (p. 70).
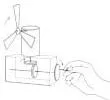
The five steps in Figure 3.9 build it in order (p. 71): a cardboard box with holes in opposite sides; a straw axle passing through the box with a circular cardboard piece at each end; a stack of two circular pieces at the ends of the straw; a chart-paper cylinder; and a fan of blades from chart paper, assembled on the straw.
Each wheel-and-axle pair balances the other, exactly as the book said about wheel and axle (p. 67). This toy is the chapter’s bridge to the bicycle, which is also a combination of simple machines.
The Bicycle: A Complex Machine of Simple Machines
Now the project turns from making to maintaining. A bicycle uses wheels, wheels and axles, levers and pulleys (p. 73), and all its parts work together to turn the rider’s effort into motion.
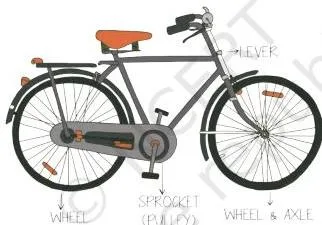
Figure 3.10 labels the parts of a bicycle, and Table 3.2 (p. 73–74) tells you what each does.
The five functions worth memorising: brakes slow or stop the bicycle, brake pads grab the rims to resist motion, the chain transfers power to the rear wheel, chain rings and the sprocket transmit power from the pedal to the chain, hubs let the wheel spin around the axle, and spokes connect the rim to the hub.
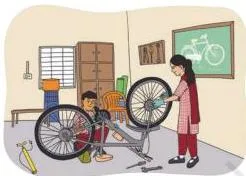
Figure 3.11 shows the maintenance half of the project (p. 75). It leads into Table 3.3, a fixing-parts checklist where you record, for each part of a bicycle — brake, chain, spokes, kickstand, handlebars, tyre — its function, whether it is functioning well, and whether you fixed it.
Definitions the Chapter Uses
Here is every machine term the chapter defines, in plain words, with the page where the book introduces it. A complex machine is simply many simple machines working together (p. 58).
| Term | Plain meaning | NCERT page |
|---|---|---|
| Simple machine | A basic device that makes work easier, helping us do things beyond our own strength | p. 58 |
| Inclined plane | A sloping surface used to move heavy loads up or down with less force | p. 59 |
| Pulley | A wheel with a rope around it that helps lift heavy objects | p. 59 |
| Lever | A fixed bar or handle that moves around a fixed point | p. 62 |
| Hinge / fulcrum | The fixed point around which a lever moves | p. 62 |
| Propeller | A wheel with blades that pushes through water or air to move something | p. 65 |
| Wheel and axle | Wheels held together by a rod so they move together; two sets balance and carry loads | p. 67 |
| Windmill | A machine that generates energy from wind; the model combines a propeller with a wheel and axle | p. 70 |
Common Mistakes in This Chapter
Most toy failures come from missed details, not from hard steps. The book plants the corrections inside the activity instructions — here they are named before you make the mistake.
| Mistake | Correct rule | How to check |
|---|---|---|
| Bottle-cap holes not centred | Pierce the exact centres of the caps so the wheels turn evenly (p. 68) | Spin each wheel; a wobbly wheel means an off-centre hole |
| No glue where sticks join | The robotic arm needs glue at every joined point so the joints hold (p. 64) | Gently tug each joint; nothing should slide apart |
| Releasing the rubber band car on uneven ground | Release on stable ground (p. 68) | Run the car on a flat, smooth floor |
| Skipping regular air-pressure checks | Check tyre air pressure regularly to avoid flat tyres (p. 74) | Squeeze the tyre; if it feels soft, pump air |
| Ignoring rust and loose parts | Clean rusted parts with sandpaper, apply oil or paint, and fix loose parts with proper tools (p. 74) | Run a hand over the frame and wheels; rust feels rough, loose parts rattle |
| Using cutters carelessly | Follow the safety rules: be careful with cutting tools and sharp edges, clean up afterwards (p. 60) | Cut away from your body; store tools as the teacher instructs |
| Unsafe internet browsing | Do not upload or download anything; do not share personal information (p. 62) | Work only with your teacher’s help and supervision |
Worked Example: How Many Times Does a Wheel Turn in 10 Metres?
The chapter’s Think and Answer section asks you to estimate how many times the wheel rotates while the bicycle covers 10 metres, using either the rim’s circumference or by observing the tyre (p. 79). The answer depends entirely on the wheel’s size, so here is the method with a new wheel size — a bicycle wheel of diameter 70 cm.
Step 1: Measure the diameter of the wheel with a metre scale.
Here, diameter = 70 cm = 0.70 m.
Step 2: Find the radius — half the diameter.
\[ \text{radius} = \frac{0.70}{2} = 0.35\ \text{m} \]
Step 3: Compute the circumference — the distance covered in one full rotation.
\[ \text{circumference} = 2 \pi r = 2 \times 3.14 \times 0.35 \approx 2.2\ \text{m} \]
Step 4: Divide the total distance by the circumference.
\[ \text{rotations} = \frac{10}{2.2} \approx 4.5 \]
Final answer: the wheel makes between 4 and 5 full rotations in 10 metres — about 4.5 rotations for a 70 cm wheel.
Practical alternative: mark the tyre with chalk and simply count the rotations as the bicycle rolls over a measured 10 m. The bigger the wheel, the fewer the rotations needed to cover the same distance.
Doing the Project Well: Outcomes, Records and the Exhibition
This is how you know the project worked. The four outcomes from p. 59, with what to demonstrate for each:
- Make toys from waste using simple machines — show a working catapult, robotic arm, propeller boat, rubber band car, balloon car or windmill (you choose one project).
- Identify simple machines inside a complex machine — point to the wheels, levers and pulleys inside a bicycle.
- Identify bicycle parts and their functions — name each part and what it does, using Table 3.2.
- Spot and fix common problems — show how you dealt with a flat tyre, stiff wheel or misaligned brake.
Record-keeping built into the chapter
After the activities, the book asks you to record your work: a timeline table for how many periods each of the eight activities took (p. 79), and a “What did I learn from others?” page — three things learned from friends and three from the expert (p. 78).
Every toy activity also ends with two short write-ups: a labelled sketch of the toy and instructions for someone using it for the first time.
Exhibition planning checklist (p. 77)
Activity 8 condenses into ten planning steps:
- Define the purpose of the exhibition.
- Decide a theme (eco-friendly, historical, futuristic toys).
- Make sure the toys match the theme.
- Choose the exhibition space.
- Plan the layout and decorate the venue.
- Send invitations to parents and the community.
- Arrange toys attractively with a label for each.
- Keep volunteers to supervise.
- Collect feedback from visitors and students.
- Document the event with photos and videos.
The chapter closes by pointing to the jobs this project connects to: bicycle mechanic, toy maker, and engineer (p. 80). One honest note for exam planning: textbook contents and the examinable syllabus are not always identical — check the current official syllabus.
The Chapter in Brief
The whole project in one ordered sequence, for the night before:
- Spot simple machines around you and record them in Table 3.1 (p. 61).
- Learn what simple machines do — work beyond our capacity with less force (p. 58).
- Build a lever toy — the catapult or robotic arm (p. 62).
- Build a propeller toy — the propeller boat (p. 65).
- Build wheel-and-axle toys — the rubber band car and air balloon car (p. 67).
- Combine machines in the windmill model (p. 70).
- Find the same machines inside a bicycle and keep them working — check brakes, oil moving parts, keep air in the tyres (p. 73–74).
- Finish with the exhibition, the records and the reflection questions (p. 77–79).
Related Resources
This listing is maintained for the 2026-27 academic session using the NCERT textbook information available to us. NCERT remains the authority for confirming the latest edition.
Go deeper from here:
- Kaushal Bodh Class 6 book page — the full vocational education book, with the previous and next chapters.
- Class 6 NCERT books hub — all Class 6 textbooks in one place.
- Full NCERT books listing — every class and subject.
- The official Work with Machines and Materials Class 6 Chapter 3 PDF on ncert.nic.in, the authority for textbook editions and PDFs.
Sources and Data Verification
Four things, stated plainly for parents and teachers:
- The figures and page references on this page describe the NCERT Kaushal Bodh (Vocational Education) textbook for Class 6.
- This page covers Chapter 3, “Work with Machines and Materials” (the Maker Skills project), printed pages 54–80 of the official edition. Other Kaushal Bodh chapters are listed on the book page linked above.
- This listing is maintained for the current academic session using the NCERT information available to us.
- NCERT settles textbooks, editions and PDFs; CBSE settles curriculum, syllabus and examinations.
| What the chapter holds | Count | Where it is used |
|---|---|---|
| Printed pages | 26 | |
| Figures with NCERT captions | 42 | |
| Tables | 5 | |
| Official NCERT PDF | Download the chapter PDF | the chapter exactly as NCERT publishes it |
Reference: NCERT Class 6 Kaushal Bodh textbook, chapter 3, official edition on ncert.nic.in.
Frequently Asked Questions
Where can I download the official Work with Machines and Materials Class 6 chapter PDF?
From NCERT’s website. Use the Work with Machines and Materials Class 6 Chapter 3 PDF link on this page — it opens the official chapter file covering pages 54–80 of Kaushal Bodh Grade 6.
What is a lever and which toys in this chapter use one?
A lever is a fixed bar or handle that moves around a fixed point called the hinge or fulcrum (p. 62). Opening a tin lid with a spoon is a lever, and so is a seesaw. The catapult uses a single lever and the robotic arm uses multiple levers (p. 62–64).
How many times does a bicycle wheel rotate while covering 10 metres?
It depends on the wheel’s size. For a wheel of diameter 70 cm, the circumference is about 2.2 m, so the wheel makes about 4.5 rotations — between 4 and 5 full turns — over 10 metres. You can also mark the tyre with chalk and count the rotations directly (p. 79).
What are the main parts of a bicycle and what does each part do?
The key ones from Table 3.2 (p. 73–74): brakes slow or stop the bicycle; brake pads grab the rims to resist motion; the chain transfers power to the rear wheel; chain rings and the sprocket transmit power from the pedal to the chain; hubs let the wheel spin around the axle; spokes connect the rim to the hub; the saddle is where the rider sits.
Which materials and tools do I need for the toy-making activities?
For toys: cardboard, plastic bottles and bottle caps, ice cream sticks, drinking straws, rubber bands, glue and tape, clothes clips, a balloon, chopsticks and a colour box — with scissors, a metre scale and a cutter as tools (p. 60). Exact lists for each toy are given under each activity’s materials heading.
How do I keep a bicycle in good working condition?
Check it regularly. Clean rusted parts with sandpaper and apply oil or paint, fix loose parts with the proper tools, oil moving parts so wheels turn freely, and check tyre air pressure regularly to avoid flat tyres (p. 74).
Explore Class 6 Vocational Education Books
- Previous: Project 2
- Next: Project 4
Related chapters:
- Work with
- Project 5
- Project 6